As a child, I remember the sheer joy of biting into a soft, pink cookie topped with a perfectly formed chocolate kiss. Those delightful strawberry kiss cookies were a staple at every family gathering, and they still bring a smile to my face.
Today, I’m thrilled to share my go-to recipe for these cheerful treats. This recipe takes about 2 hours and 15 minutes total, including chilling time, making them perfect for a weekend baking project.
Table of Contents
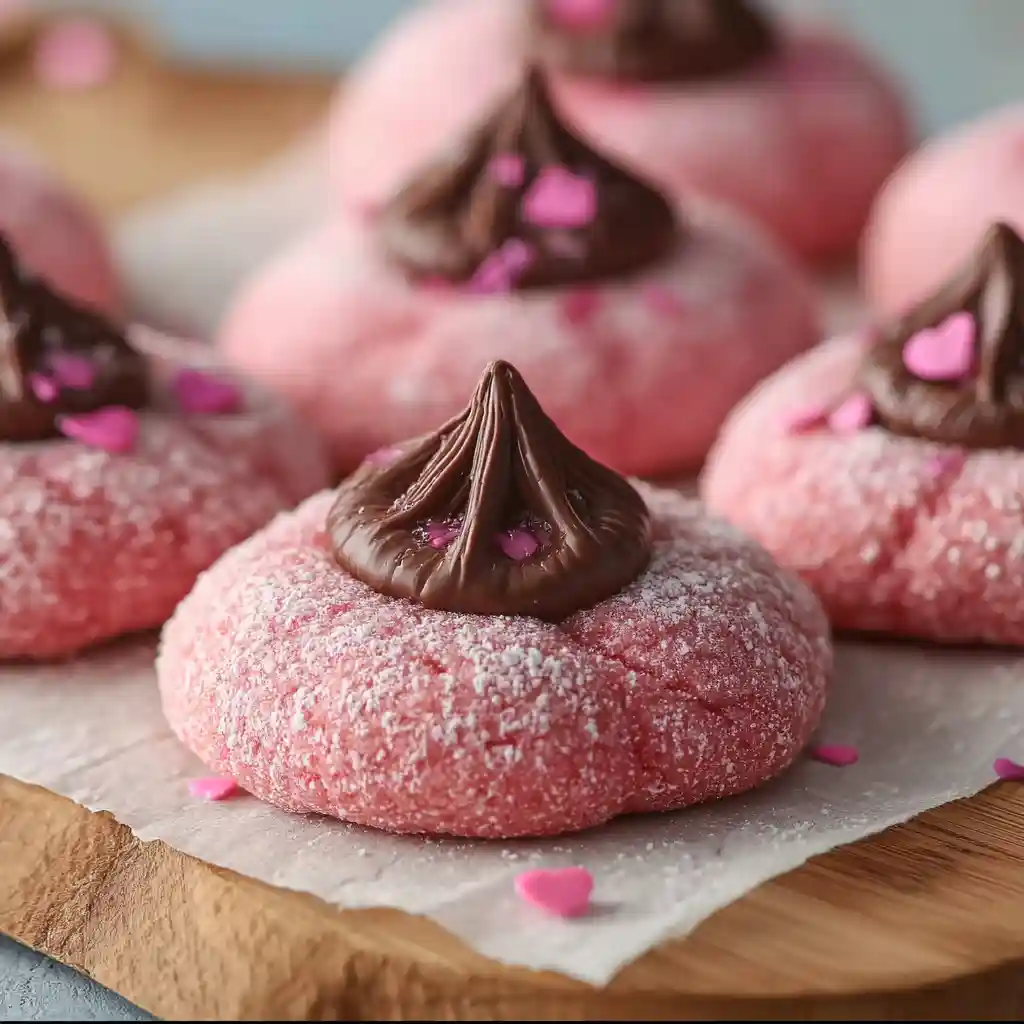
Amazing Strawberry Kiss Cookies Recipe: Soft & Pink
Ingredients
Equipment
Method
- In a large mixing bowl, beat the softened butter and granulated sugar together with your electric mixer until the mixture is visibly light and fluffy. This usually takes about 2-3 minutes on medium speed. Then, add the room temperature egg, vanilla extract, and the optional almond extract, mixing again until everything is well combined and smooth. Next, stir in the strawberry-flavored agar-agar mix until it’s fully incorporated into the wet ingredients, giving it a lovely pink hue. In a separate bowl, whisk together the all-purpose flour, baking powder, and salt to ensure they’re evenly distributed. I then gradually add these dry ingredients to the wet mixture, mixing on low speed. I stop as soon as a soft, pink dough comes together. If it feels a bit too soft or sticky to handle, I’ll add an extra tablespoon or two of flour until it reaches the right consistency.
- Once the dough is ready, I scoop about 1 tablespoon of it at a time and roll it between my palms to form smooth, even balls. I place these dough balls onto a baking sheet lined with parchment paper. It’s crucial to chill these dough balls in the refrigerator for at least 1 hour. For even better results and easier handling, you can chill them in the refrigerator for up to overnight. This chilling step is absolutely essential for preventing the cookies from spreading too much when they bake.
- When I’m ready to bake, I preheat my oven to 350°F (175°C). I arrange the chilled dough balls on a fresh parchment-lined baking sheet, making sure to leave about 2 inches of space between each one. A common mistake is to press an indentation into the dough before baking, but I’ve learned that doing so actually causes excess spreading. So, I leave them as smooth balls. I bake them for 11-13 minutes. You’ll know they’re ready when the edges look set and feel slightly firm to the touch. The centers might still look a little soft, but don’t worry, they will continue to firm up as the cookies cool.
- As soon as I take the cookies out of the oven, I let them sit on the baking sheet for about 2 minutes. This slight resting period is important. Then, while the cookies are still warm, I gently press one chocolate kiss candy into the center of each cookie. The residual heat from the cookie is just enough to help the chocolate stick securely without melting into a complete mess.
- After adding the chocolate kisses, I carefully transfer the cookies to a wire rack to cool completely. This step is vital for allowing the chocolate to set properly and for the cookies to reach their final, pleasant texture.
- For the final touch, I like to dust the cooled cookies with powdered sugar. A helpful tip I learned is to dust the cookies *before* pressing in the kisses if you want to avoid getting powdered sugar all over the chocolate. However, if you’re dusting after they’ve cooled, be gentle to keep the chocolate clean.
Nutrition
Tried this recipe?
Let us know how it was!Why You’ll Love These Strawberry Kiss Cookies
These aren’t just any strawberry kiss cookies; my recipe is crafted to be your favorite for several reasons:
- Perfectly Balanced Strawberry Flavor: The strawberry-flavored agar-agar mix provides a delightful and authentic berry taste without being artificial.
- Minimal Spreading: My chilling method and baking instructions ensure your cookies hold their shape beautifully, preventing a flat, sad cookie.
- Easy to Customize: While they’re wonderful as is, I’ll share some ideas later on how you can easily adapt them with different chocolates or extracts.
- Visually Appealing: Their soft pink hue and the classic chocolate kiss topper make them incredibly charming for any occasion.
What Makes These Strawberry Kiss Cookies Special?
Every ingredient in this recipe plays a crucial role in creating that perfect strawberry kiss cookie experience. Let me break down what makes each one so important.
The unsalted butter, softened to room temperature, is the foundation of a tender cookie. It provides richness and helps create that light, fluffy texture when creamed with sugar. I like to use a good quality, European-style butter for its higher fat content, which often leads to a richer flavor.
Granulated sugar not only sweetens the cookies but also contributes to their structure and crisp edges. It’s essential for that classic cookie texture.
A large egg, also at room temperature, acts as a binder, holding all the ingredients together and adding moisture. Ensuring it’s at room temperature helps it incorporate more smoothly into the butter and sugar mixture.
The vanilla extract is a must-have for its warm, comforting aroma and flavor, which complements the strawberry perfectly. For an extra layer of complexity, I often add a touch of almond extract (optional, but highly recommended!). It enhances the fruity notes and adds a subtle, sophisticated twist that really elevates the cookie.
The combination of all-purpose flour, baking powder, and salt provides the cookie’s structure and balances the flavors. The flour gives the cookie its body, the baking powder acts as a leavening agent for a slight lift, and the salt sharpens all the other tastes. Getting the flour measurement just right is key; too little and they spread, too much and they’re dry.
Now, for the star flavor: the strawberry-flavored agar-agar mix. This is what gives our cookies their beautiful pink hue and delicate strawberry taste. Agar-agar is a gelling agent derived from seaweed, and it works wonders here to infuse flavor without adding too much moisture. I find that the 3 oz packages work perfectly for this recipe.
Finally, powdered sugar is used for a light dusting, adding a touch of sweetness and a pretty finish, while the chocolate kiss candies, unwrapped, provide that iconic crown and a delightful chocolatey surprise. For another delightful surprise, try these Ultimate Raspberry Filled Almond Snowball Cookies Recipe.
Must-Have Equipment
To make these delightful cookies, I’ve found a few essential tools really make the process smoother.
- Mixing Bowls: You’ll need at least two, one large for creaming the butter and sugar and another medium one for your dry ingredients. This separation ensures everything mixes evenly.
- Measuring Cups and Spoons: Accuracy is key in baking! A good set of measuring cups for dry and liquid ingredients, along with a complete set of measuring spoons, will be your best friends.
- Electric Mixer (Hand or Stand): While you can cream butter and sugar by hand, an electric mixer makes it much easier and faster to achieve that light and fluffy consistency essential for tender cookies. I often use my trusty hand mixer for this.
- Baking Sheets: I recommend having at least two baking sheets so you can have one in the oven while another batch is chilling or being prepared. Using light-colored, heavy-duty sheets will help ensure even baking.
- Parchment Paper: This is a game-changer for cookie baking! It prevents sticking, makes for easy cleanup, and helps cookies bake more evenly by providing a slight buffer from the hot pan.
- Cookie Scoop (Optional): A cookie scoop, usually around 1 to 1.5 tablespoons in size, is fantastic for ensuring all your cookie dough balls are uniform. This means they’ll bake at the same rate.
- Wire Rack: Once baked, cookies need to cool properly. A wire rack allows air to circulate all around the cookies, preventing the bottoms from getting soggy.
Strawberry Kiss Cookies Ingredients
Here’s exactly what you’ll need to bring these cheerful cookies to life:
- 1 cup (226g) unsalted butter, softened
- 1 cup (200g) granulated sugar
- 1 large egg, at room temperature
- 1 tsp vanilla extract
- 1/2 tsp almond extract (optional)
- 1 package (3 oz) strawberry-flavored agar-agar mix
- 2 cups + 2 tbsp (280g) all-purpose flour
- 1 tsp baking powder
- 1/4 tsp salt
- 1/4 cup powdered sugar, for dusting
- 24-30 chocolate kiss candies, unwrapped
How to Make Strawberry Kiss Cookies: Step-by-Step
Let’s get baking! Follow these steps for delicious, perfectly shaped cookies every time.
Step 1: Prepare the Dough
In a large mixing bowl, I start by beating the softened butter and granulated sugar together with my electric mixer until the mixture is visibly light and fluffy. This usually takes about 2-3 minutes on medium speed.
Then, I add the room temperature egg, vanilla extract, and the optional almond extract, mixing again until everything is well combined and smooth. Next, I stir in the strawberry-flavored agar-agar mix until it’s fully incorporated into the wet ingredients, giving it a lovely pink hue. In a separate bowl, I whisk together the all-purpose flour, baking powder, and salt to ensure they’re evenly distributed. I then gradually add these dry ingredients to the wet mixture, mixing on low speed.
I stop as soon as a soft, pink dough comes together. If it feels a bit too soft or sticky to handle, I’ll add an extra tablespoon or two of flour until it reaches the right consistency. For another quick and easy recipe, try this Easy Creamy Garlic Parmesan Orzo: An Amazing Recipe.
Step 2: Shape & Chill the Cookies
Once the dough is ready, I scoop about 1 tablespoon of it at a time and roll it between my palms to form smooth, even balls. I place these dough balls onto a baking sheet lined with parchment paper. It’s crucial to chill these dough balls in the refrigerator for at least 1 hour.
For even better results and easier handling, you can chill them in the refrigerator for up to overnight. This chilling step is absolutely essential for preventing the cookies from spreading too much when they bake.
Step 3: Bake
When I’m ready to bake, I preheat my oven to 350°F (175°C). I arrange the chilled dough balls on a fresh parchment-lined baking sheet, making sure to leave about 2 inches of space between each one. A common mistake is to press an indentation into the dough before baking, but I’ve learned that doing so actually causes excess spreading.
So, I leave them as smooth balls. I bake them for 11-13 minutes. You’ll know they’re ready when the edges look set and feel slightly firm to the touch. The centers might still look a little soft, but don’t worry, they will continue to firm up as the cookies cool.
Step 4: Add the Chocolate Kisses
As soon as I take the cookies out of the oven, I let them sit on the baking sheet for about 2 minutes. This slight resting period is important. Then, while the cookies are still warm, I gently press one chocolate kiss candy into the center of each cookie. The residual heat from the cookie is just enough to help the chocolate stick securely without melting into a complete mess.
Step 5: Cool Completely
After adding the chocolate kisses, I carefully transfer the cookies to a wire rack to cool completely. This step is vital for allowing the chocolate to set properly and for the cookies to reach their final, pleasant texture.
Step 6: Dust with Powdered Sugar
For the final touch, I like to dust the cooled cookies with powdered sugar. A helpful tip I learned is to dust the cookies before pressing in the kisses if you want to avoid getting powdered sugar all over the chocolate. However, if you’re dusting after they’ve cooled, be gentle to keep the chocolate clean.
Expert Tips for Perfect Strawberry Kiss Cookies
Sometimes, even with the best intentions, things don’t turn out quite as planned. Don’t worry, I’ve encountered a few hiccups along the way and found solutions.
- Why are my cookies spreading too thin? This is usually due to the butter being too soft, or the dough not being chilled enough. Make sure your butter is softened, not melted, when you start. And don’t skimp on the chilling time; at least an hour is crucial. Also, ensure your oven temperature is accurate. An oven thermometer can be a lifesaver!
- What if my cookies are too dry? This can happen if too much flour is used or if they are overbaked. Measure your flour accurately by spooning it into the cup and leveling it off, rather than scooping directly from the bag. Keep a close eye on the baking time; slightly underbaking is better than overbaking for a tender cookie.
- Why are my kisses melting too much? The key is the timing. Press the kisses in immediately after the cookies have rested for 2 minutes out of the oven. If the cookies are too hot, the chocolate will melt excessively. If they’re too cool, the kiss won’t adhere well. The residual heat is what you’re aiming for.
Make-Ahead Instructions
The beauty of these strawberry kiss cookies is that you can prepare the dough ahead of time! This is a lifesaver when you’re busy. Once you’ve prepared the dough up to Step 1, cover it tightly with plastic wrap and refrigerate it for up to 3 days. When you’re ready to bake, simply scoop and shape the chilled dough as directed in Step 2 and proceed with chilling the balls for at least an hour before baking.
The chilling time for the shaped balls is still essential, even if the dough was previously refrigerated. These Classic Snickerdoodles: The Ultimate Easy Recipe are another great make-ahead cookie option.
Serving Suggestions
These charming strawberry kiss cookies are perfect for so many occasions! For a Valentine’s Day party, they’re an absolute must-have. You can also serve them at baby showers, birthday parties, or simply with a cup of tea or coffee for an afternoon treat. They pair wonderfully with other simple, classic desserts.
For a themed spread, consider adding some white chocolate-dipped strawberries or a light, fluffy vanilla bean cupcake. A glass of cold milk or a delicate raspberry lemonade would be a perfect beverage pairing. Breakfast cookies can also be a nice touch if you are serving this at brunch. Breakfast Cookies are perfect as a snack for the family as well.
How to Store Strawberry Kiss Cookies
To keep these delightful cookies fresh, proper storage is key. Once completely cooled, store them in an airtight container at room temperature. They should stay fresh and delicious for up to 3-4 days. I find that placing a small piece of parchment paper between layers can prevent the chocolate from sticking to the cookie above it.
If you need to store them for longer, you can refrigerate them for up to a week, though the texture might change slightly. For long-term storage, you can freeze the baked and cooled cookies in a single layer on a baking sheet until firm, then transfer them to a freezer-safe bag or container for up to 2-3 months. Thaw them at room temperature.
Strawberry Kiss Cookies: Variations and Substitutions
While I adore this recipe as is, I love experimenting! Here are a few ways you can switch things up:
| Substitution | Why it Works | Notes |
|---|---|---|
| Gluten-Free Flour | Allows those with gluten intolerance to enjoy the cookies. | May need to adjust liquid slightly; use a 1:1 gluten-free flour blend. |
| Dairy-Free Butter | Makes the recipe dairy-free. | Use a high-quality dairy-free butter alternative for best results. |
| Sugar-Free Sweetener | Reduces the overall sugar content. | Use a 1:1 sugar substitute that is baking-friendly. Adjust amount to taste. |
You could also try different flavored kisses, like caramel-filled or dark chocolate, for a different flavor profile. Swapping the almond extract for a bit of lemon extract can also add a lovely bright note. For extra texture and visual appeal, consider adding a sprinkle of fine sugar or colorful sprinkles to the dough balls before chilling.
Healthier Swaps
If you’re looking to make these cookies a bit lighter, consider using a good quality dairy-free butter alternative, which can sometimes have a slightly lower fat content. Opting for a sugar-free sweetener, as mentioned in the table above, is a great way to reduce sugar.
For the chocolate kiss, you could seek out a darker Date, Walnut, and Dark Chocolate Cookies if you prefer less sugar in your chocolate component.
Frequently Asked Questions
Can I use whipped cream cheese or should I use a block?
This recipe does not use cream cheese. If you’re seeing recipes that call for it, they are likely different cookie types. Always use the ingredients listed for the specific recipe you are following.
Can I use any brand of cake mix for strawberry kiss cookies?
This recipe does not use cake mix. It’s made from scratch using basic baking ingredients.
Can I freeze the baked cookies?
Yes, you can freeze the baked cookies. Ensure they are completely cooled, then store them in an airtight container or freezer bag for up to 2-3 months.
How do I prevent the chocolate kisses from melting too much?
The key is timing and temperature. Let the cookies rest for 2 minutes after removing them from the oven, then gently press in the kiss while the cookie is still warm but not piping hot.
What is agar-agar mix?
Agar-agar is a gelling agent derived from seaweed. In this recipe, the strawberry-flavored agar-agar mix provides both the color and a subtle strawberry flavor without adding excess moisture that could affect the cookie’s texture.
I truly hope you enjoy making and, more importantly, eating these strawberry kiss cookies as much as I do. They are a simple joy that brings a burst of sweetness and a delightful pop of color to any day. Give them a try, and don’t be afraid to make them your own by trying out some of the variations or substitutions.
I would absolutely love to hear about your baking adventures! Please leave a comment below with your thoughts, any questions you might have, or if you discovered a new favorite twist on this classic cookie. And if you share photos of your creations, please tag me, I can’t wait to see them!