Introduction
Oh, hello there! I’m so excited to share this recipe with you today. It’s one of those kitchen magic moments that turns simple ingredients into something truly special. I’ve been experimenting with ways to get that decadent cheesecake flavor into a healthier snack, and I think I’ve cracked it with these Biscoff Cheesecake Protein Balls. They’re incredibly easy to whip up, requiring no baking whatsoever, and are ready in under 30 minutes.
If you’re looking for a delicious, protein-packed treat that satisfies your sweet tooth, you’ve found it!
Table of Contents
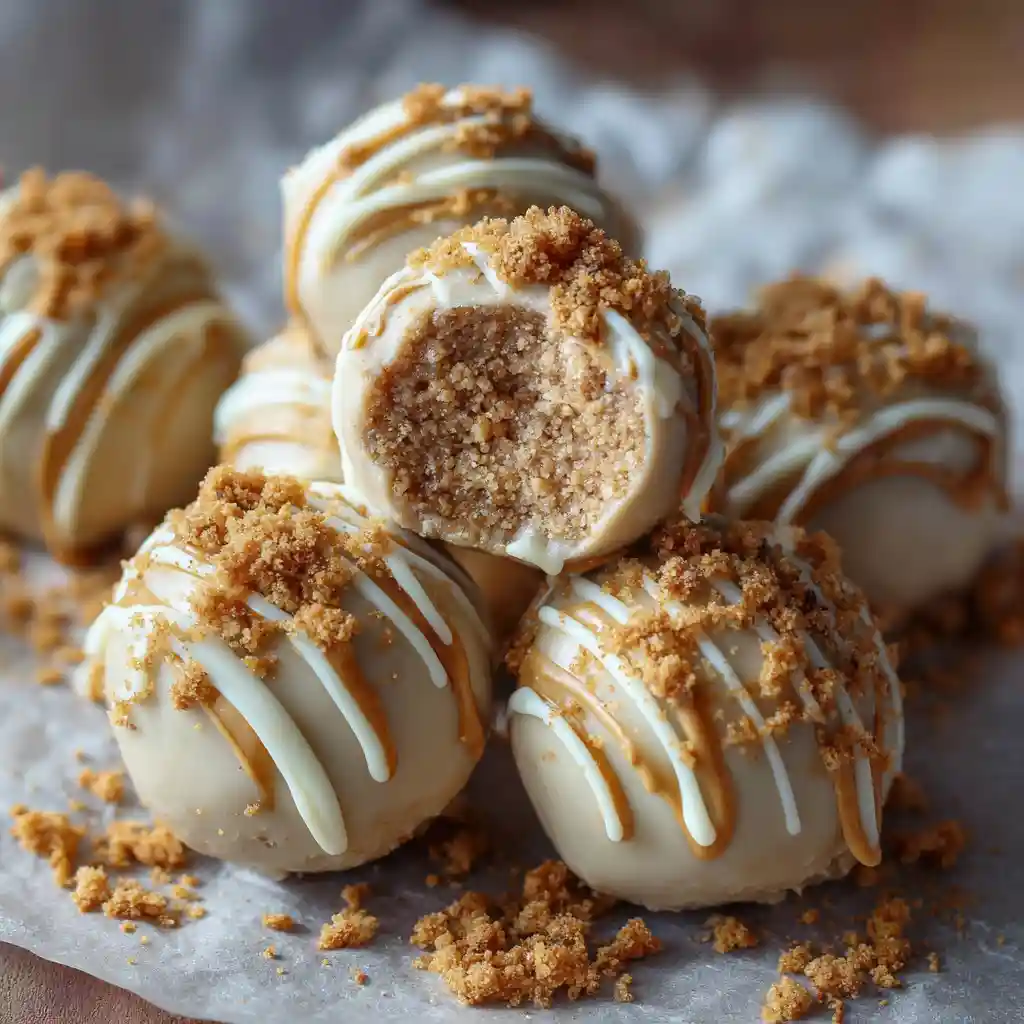
The Ultimate Biscoff Cheesecake Protein Balls
Ingredients
Equipment
Method
- In a mixing bowl, combine the vanilla protein powder, coconut flour, granulated sugar, and softened cream cheese. Mix everything together thoroughly until a cohesive dough forms. If the dough feels too soft and sticky, gradually add a little more coconut flour, a teaspoon at a time. If it’s too thick, add a teaspoon or more of water or unsweetened almond milk until it reaches a workable consistency.
- Once your dough is ready, roll it into tablespoon-sized balls. I like to use my hands for this, aiming for nice, even spheres. Place the rolled balls onto a plate or tray lined with parchment paper. Refrigerate these protein balls for at least 15 minutes to allow them to firm up. This step is crucial for them to hold their shape.
- If you’re adding the white chocolate coating (and I highly recommend it!), melt the white chocolate chips in a microwave-safe bowl. Heat in 20-second intervals, stirring well between each burst, until completely smooth and melted. Carefully dip each chilled protein ball into the melted white chocolate, letting any excess drip off. Place the dipped balls back onto the parchment paper. While the chocolate is still wet, sprinkle the crushed cookie crumbs on top for that extra flair and flavor.
Nutrition
Notes
Tried this recipe?
Let us know how it was!Why You’ll Love These Biscoff Cheesecake Protein Balls
I know there are a ton of protein ball recipes out there, but these are genuinely special. Here’s why I think you’ll adore them:
- Irresistible Flavor Fusion: They perfectly capture the cozy, spiced notes of Biscoff cookies and the creamy tang of cheesecake, all in one bite. It’s a flavor combination that’s hard to resist.
- Effortlessly Healthy Indulgence: You get all the deliciousness of a dessert without the guilt. They’re packed with protein to keep you satisfied and energized, making them a fantastic guilt-free snack.
- Quick & No-Bake Convenience: Seriously, no oven required! You can mix them up, roll them, and have them chilling in the fridge in less time than it takes to preheat an oven. Perfect for busy days.
- Customizable and Satisfying: Whether you need a post-workout refuel or a healthy dessert, these protein balls hit the spot. They’re incredibly versatile and can be tailored to your preferences.
What Makes Them “Cheesecake”? (And How We Achieve It No-Bake)
The secret to that unmistakable cheesecake vibe is actually quite simple: cream cheese! I use about 3 tablespoons of cream cheese per batch, and its natural tang and creamy texture are key to mimicking the flavor and mouthfeel of actual cheesecake. It binds the ingredients together beautifully, creating a luscious dough.
For the “crust” element, we’re using crushed Biscoff cookies, which add that signature spiced cookie flavor and a slight crunch, reminiscent of a graham cracker crust. By combining these elements with protein powder and a touch of sweetness, I achieve that beloved cheesecake experience without ever turning on the oven.
Equipment You’ll Need
To make these delightful protein balls, you won’t need much! Here’s a quick list of what I usually grab from my kitchen:
- Mixing Bowl
- Spoon or Spatula
- Parchment Paper
- Microwave-safe Bowl (if you plan to melt the white chocolate)
A small cookie scoop can be handy if you want to ensure all your protein balls are perfectly uniform in size, but it’s not essential.
Ingredients for Biscoff Cheesecake Protein Balls
Here are the stars of the show! I’ve included a few notes to help you get the best results.
- 1/4 cup vanilla protein powder\* (I like to use a good quality vanilla whey or plant-based blend for a smooth flavor and texture. Make sure it’s one you enjoy the taste of on its own!)
- 2 Tbsp coconut flour (This is a super absorbent flour that helps thicken the batter without adding too many carbs. You might need to adjust this slightly.)
- 1 1/2 Tbsp granulated sugar of choice\\ (, can use granulated monk fruit sweetener) (I often use erythritol or a monk fruit blend, but regular granulated sugar or coconut sugar works too. Adjust to your sweetness preference!)
- 3 Tbsp cream cheese of choice\\\* ((about 1.5 oz)) (Full-fat cream cheese gives the best richness and tang, but light or a dairy-free alternative can work. Make sure it’s softened for easy mixing.)
- 2 biscoff cookies, crushed (These are essential for that signature spiced cookie flavor and a little texture.)
- 1/4 cup white chocolate chips, melted (Optional, for dipping and drizzling. I love how the sweetness of white chocolate pairs with the Biscoff and cheesecake notes.)
Step-by-Step Instructions to Make Biscoff Cheesecake Protein Balls
These come together so quickly, I promise!
- In a mixing bowl, combine the vanilla protein powder, coconut flour, granulated sugar, and softened cream cheese. Mix everything together thoroughly until a cohesive dough forms. If the dough feels too soft and sticky, gradually add a little more coconut flour, a teaspoon at a time. If it’s too thick, add a teaspoon or more of water or unsweetened almond milk until it reaches a workable consistency\\\\.
- Once your dough is ready, roll it into tablespoon-sized balls. I like to use my hands for this, aiming for nice, even spheres. Place the rolled balls onto a plate or tray lined with parchment paper. Refrigerate these protein balls for at least 15 minutes to allow them to firm up. This step is crucial for them to hold their shape.
- If you’re adding the white chocolate coating (and I highly recommend it!), melt the white chocolate chips in a microwave-safe bowl. Heat in 20-second intervals, stirring well between each burst, until completely smooth and melted. Carefully dip each chilled protein ball into the melted white chocolate, letting any excess drip off. Place the dipped balls back onto the parchment paper. While the chocolate is still wet, sprinkle the crushed cookie crumbs on top for that extra flair and flavor.
Tips for Perfectly Rolled Biscoff Cheesecake Protein Balls
Getting the texture just right is key to perfect protein balls. If your mixture is too soft and sticky to roll, don’t worry! It usually just means it needs a bit more binder. Try adding another teaspoon of coconut flour or a touch more protein powder. If it’s too dry and crumbly, add a tiny bit more liquid – start with half a teaspoon of water or almond milk and see how it comes together.
Sometimes a bit of extra kneading by hand helps bind everything. For uniform size, using a tablespoon measure to scoop portions before rolling can be a game-changer. And remember, chilling is your friend; it makes the balls easier to handle and ensures they keep their shape beautifully.
Delicious Variations & Substitutions
I love that these protein balls are so adaptable! Here are some ways you can mix them up.
| Category | Substitution/Variation |
|---|---|
| Dietary Needs | Vegan/Dairy-Free: Use plant-based cream cheese (like a cashew or almond-based one), vegan protein powder, and dairy-free white chocolate chips. |
| Gluten-Free: Ensure your protein powder is certified gluten-free, and use gluten-free Biscoff-style cookies (if available) or another gluten-free cookie. | |
| Flavor Enhancers | Different Spreads: Swap Biscoff spread for smooth almond butter, creamy peanut butter, or another cookie butter for a different nutty twist. |
| Extracts: Add a few drops of vanilla extract, almond extract, or cinnamon extract to the dough for an intensified flavor profile. | |
| Citrus Zest: A tiny pinch of lemon zest can really amplify that “cheesecake” tang and add brightness. | |
| Nutritional Boosts | Add-ins: Gently fold in chia seeds, flax seeds, finely chopped nuts (like almonds or pecans), or even a tablespoon of rolled oats for extra fiber and healthy fats. |
| Biscoff Alternatives | No Biscoff? Don’t fret! Use crushed graham crackers, digestive biscuits, or even ginger snaps for a different, yet equally delicious, cookie base. |
| Sweetness Adjustments | Adjust the granulated sugar to your personal preference. If you prefer a liquid sweetener like maple syrup or agave, you might need to add a little extra coconut flour as liquids can make the dough softer. |
Serving Suggestions & Pairing Ideas
These Biscoff Cheesecake Protein Balls are wonderfully versatile. I love having one or two after a workout to refuel, or as a sweet treat when an afternoon slump hits. They also make a fantastic, healthier dessert option.
You could even pop a few into a lunchbox for a delightful surprise! They pair beautifully with a cup of coffee or tea, or even a glass of cold almond milk. Honestly, they’re perfect anytime you need a little energy boost and a moment of deliciousness.
Storing Your Biscoff Cheesecake Protein Balls for Freshness
Keeping these treats fresh is easy! I store mine in an airtight container in the refrigerator. They’ll stay delicious for about 5-7 days. If you want to make a larger batch for meal prep, you can absolutely freeze them.
Just place them in a single layer on a parchment-lined baking sheet until firm, then transfer them to a freezer-safe bag or container. They should last in the freezer for up to 2-3 months. When you’re ready to enjoy a frozen one, just let it thaw at room temperature for about 15-20 minutes.
FAQs about Biscoff Cheesecake Protein Balls
Can I use whey vs. plant-based protein?
Yes, absolutely! I’ve found that both whey and plant-based vanilla protein powders work well. Just be mindful that different protein powders can have slightly different absorbency, so you might need a tiny adjustment in the coconut flour. The key is to use a vanilla flavor you truly enjoy.
How long do these Biscoff Cheesecake Protein Balls last in the fridge?
In the freezer? In the refrigerator, stored in an airtight container, they are best enjoyed within 5-7 days. For longer storage, you can freeze them for up to 2-3 months.
Are these suitable for meal prep?
Definitely! They are perfect for meal prep. You can make a big batch at the start of the week and have a healthy snack ready whenever you need it, either from the fridge or thawed from the freezer.
What if my mixture is too dry or too wet?
If your mixture is too dry and crumbly, add liquid a teaspoon at a time (water or almond milk) until it comes together. If it’s too wet and sticky, add more coconut flour, a teaspoon at a time, until it’s rollable.
Can I omit the Biscoff cookies from the recipe?
You can, but you’ll lose that signature Biscoff flavor and some texture. For a similar vibe, I’d suggest substituting them with crushed graham crackers or digestive biscuits.
Can I use a different granulated sweetener or a liquid sweetener?
Yes, you can adjust the sweetener to your liking! If you use a different granulated sweetener like coconut sugar or erythritol, it should work similarly. If you opt for a liquid sweetener like maple syrup or agave, you might need to add a bit more coconut flour to compensate for the extra moisture.
Conclusion
I really hope you give these Biscoff Cheesecake Protein Balls a try! They’re such a fun, delicious, and healthy way to satisfy those sweet cravings. I love them because they feel like a treat but pack a protein punch that keeps me going. They’re proof that you don’t need to sacrifice flavor for health.
Let me know in the comments below if you make them, what variations you tried, or if you have any questions! I can’t wait to hear how they turn out for you!