Valentine’s Day is just around the corner, and I’ve been feeling that familiar urge to bake something special. Every year, I try to come up with a treat that feels both homemade and a little bit fancy, and this year, I think I’ve nailed it. I remember one year, my friends and I stayed up way too late, covered in powdered sugar, trying to get a batch of these perfect. It was chaotic, but the result was so worth it.
This recipe for Chocolate Peanut Butter Valentine’s Hearts is incredibly satisfying to make and even more so to eat. It takes about 30 minutes of active time, plus chilling.
Table of Contents
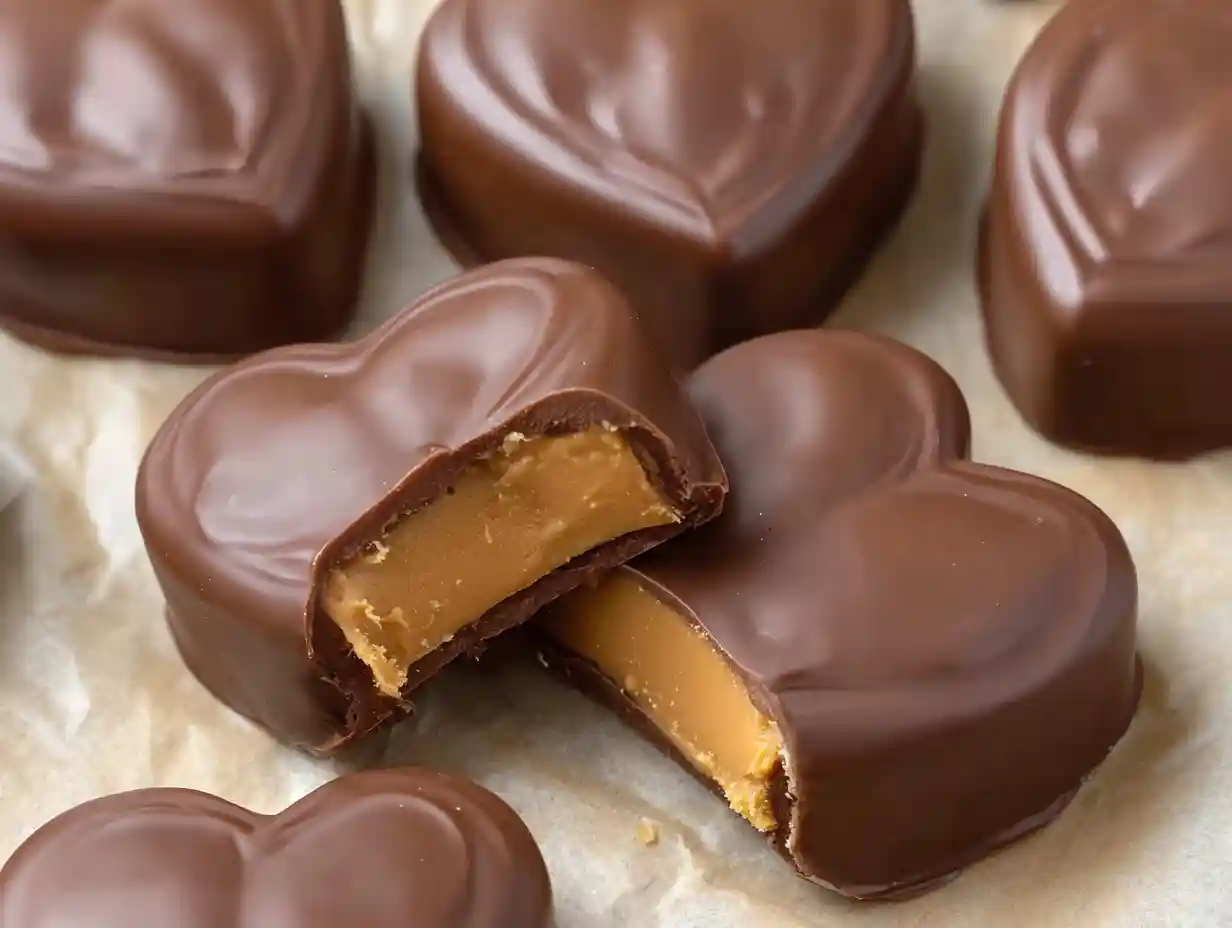
Amazing Chocolate Peanut Butter Valentine’s Heart Recipe
Ingredients
Equipment
Method
- Line an 8 x 8 inch dish with parchment paper. Make sure to leave enough overhang on the sides. This overhang acts like little handles, making it super easy to lift the whole peanut butter slab out later.
- In a mixing bowl, stir together the creamy peanut butter, melted butter, brown sugar, vanilla extract, and salt. Mix until the brown sugar is fully dissolved. Then, gradually mix in the powdered sugar until everything is well combined and forms a thick dough.
- Press the peanut butter mixture evenly into your prepared dish. You can use a spatula to smooth the top, or just press it down with your palms. Aim for a layer that’s about ½ inch thick.
- Place the dish in the freezer until the mixture is firm enough to cut. This usually takes about 15-20 minutes.
- While the peanut butter filling chills, line a tray or baking sheet with parchment paper and set it aside.
- Once the mixture is firm, use your small heart-shaped cookie cutter to cut out as many hearts as you can. Don’t worry about the scraps; gather them up, knead them together gently, and press them flat with your palms again to cut out even more hearts. This way, you waste nothing!
- Place the cut-out hearts on the prepared parchment-lined tray and put them back in the freezer until they are firm.
- Melt your chopped chocolate or candy coating. Line another tray with parchment paper.
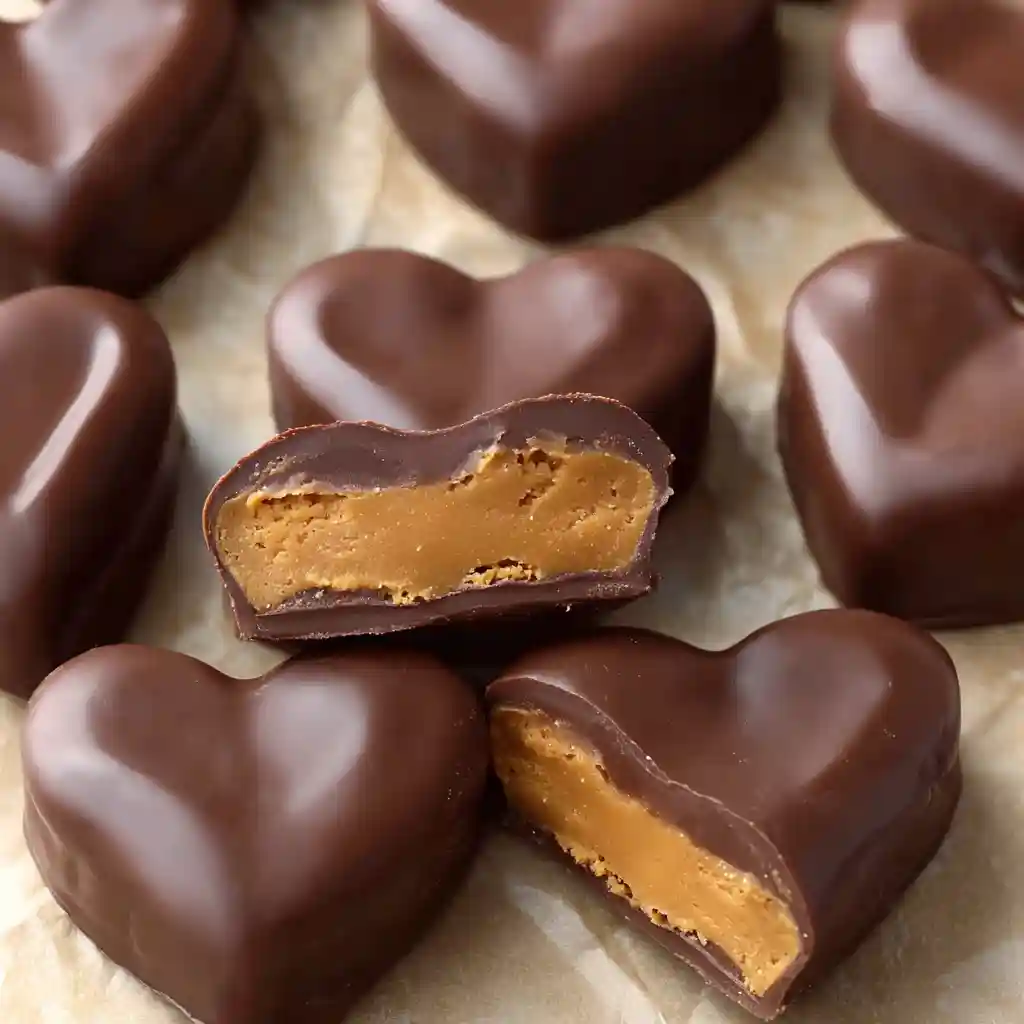
- Using a fork, dip each frozen heart into the melted chocolate, ensuring it’s completely covered. Gently tap the fork on the side of your bowl to let any excess chocolate drip off. Remember, the peanut butter mixture softens quickly at room temperature, so I find it easiest to work with just a few hearts at a time from the freezer. Place the chocolate-covered hearts onto the parchment-lined tray.
- Refrigerate the tray until the chocolate has completely set.
- Store your finished chocolate peanut butter hearts in the fridge for short-term storage or in the freezer for longer keeping.
Nutrition
Tried this recipe?
Let us know how it was!Why You’ll Love This Chocolate Peanut Butter Valentine’s Heart Recipe
I know there are tons of Valentine’s treats out there, but I keep coming back to this one for a few key reasons. It’s designed to be straightforward, even if you’re not usually a baker.
- Simplicity at its Core: The filling comes together in just a few minutes with minimal fuss. No complicated techniques, just straightforward mixing.
- Perfect Texture: The combination of creamy peanut butter, melted butter, and the sweetness of brown and powdered sugar creates a filling that’s incredibly rich and smooth. It holds its shape beautifully once chilled.
- Customizable Chocolate Coating: You have the freedom to choose your favorite chocolate or candy coating. This allows for a personalized touch, whether you prefer classic semi-sweet, creamy milk chocolate, or something else entirely.
- Effortless Cleanup: With parchment paper lining your dishes and trays, cleanup is a breeze. You can spend more time enjoying your treats and less time scrubbing pots and pans.
What You’ll Need: Ingredients for Chocolate Peanut Butter Valentine’s Hearts
Gathering your ingredients is the first step to baking success. Here’s exactly what you’ll need for these delightful hearts:
- 1 cup creamy peanut butter-room temperature
- ¼ cup unsalted butter-melted
- 2 Tablespoons brown sugar
- 2 teaspoon vanilla extract
- ¼ teaspoon salt
- 2 cups powdered sugar
- 10-12 oz. chocolate chopped in small pieces (I used half of semi-sweet and half of milk chocolate) or use good quality candy coating (it’s easier to work with than with real chocolate, if you don’t have too much experience)
When it comes to chocolate and peanut butter, the quality of your ingredients truly makes a difference. I find that using a good quality peanut butter, especially one that’s just peanuts and salt, gives the best, most authentic flavor. For the chocolate, I often use a mix of semi-sweet and milk chocolate, as I love the balance of richness and sweetness.
If you’re new to working with chocolate, good quality candy coating can be a fantastic shortcut; it melts easily and sets up beautifully, making the dipping process much more forgiving. It’s interesting to note that researchers are exploring ways of using peanut skins to fortify milk chocolate, potentially increasing the chocolate’s antioxidant levels.
These Valentine’s hearts would also pair nicely with a batch of Classic Snickerdoodles: The Ultimate Easy Recipe for a cookie exchange.
Equipment Needed
Having the right tools can make all the difference. Here are some items that will help you create perfect chocolate peanut butter hearts:
- Mixing Bowls: Essential for combining your filling ingredients.
- 8×8 Inch Baking Dish: This will be used to form the base of your peanut butter filling.
- Parchment Paper: Absolutely crucial for easy removal and minimal sticking. I like to use the kind that comes in a roll.
- Spatula: Helpful for smoothing the peanut butter mixture in the dish.
- Freezer: You’ll need this to chill the peanut butter filling.
- Cookie Cutters: Small heart-shaped cutters are perfect for creating festive shapes.
- Baking Sheets or Trays: For placing the cut-out hearts before and after dipping.
- Chocolate Melting Equipment: You can melt chocolate using a double boiler, which offers gentle, consistent heat, or in the microwave in short intervals, stirring frequently. For candy coating, the microwave is usually the easiest method.
- Fork: This is my preferred tool for dipping the hearts into the chocolate, allowing excess to drip off.
Step-by-Step Instructions for Perfect Chocolate Peanut Butter Hearts
Now for the fun part—bringing these delicious hearts to life! Follow these steps, and you’ll have a batch of irresistible treats in no time.
- Prepare Your Dish: Line an 8 x 8 inch dish with parchment paper. Make sure to leave enough overhang on the sides. This overhang acts like little handles, making it super easy to lift the whole peanut butter slab out later.
- Mix the Filling: In a mixing bowl, stir together the creamy peanut butter, melted butter, brown sugar, vanilla extract, and salt. Mix until the brown sugar is fully dissolved. Then, gradually mix in the powdered sugar until everything is well combined and forms a thick dough.
- Form the Base: Press the peanut butter mixture evenly into your prepared dish. You can use a spatula to smooth the top, or just press it down with your palms. Aim for a layer that’s about ½ inch thick.
- Chill the Filling: Place the dish in the freezer until the mixture is firm enough to cut. This usually takes about 15-20 minutes.
- Prep for Cutting: While the peanut butter filling chills, line a tray or baking sheet with parchment paper and set it aside.
- Cut Out Hearts: Once the mixture is firm, use your small heart-shaped cookie cutter to cut out as many hearts as you can. Don’t worry about the scraps; gather them up, knead them together gently, and press them flat with your palms again to cut out even more hearts. This way, you waste nothing!
- Firm the Hearts: Place the cut-out hearts on the prepared parchment-lined tray and put them back in the freezer until they are firm.
- Melt the Chocolate: Melt your chopped chocolate or candy coating. Line another tray with parchment paper.
- Dip the Hearts: Using a fork, dip each frozen heart into the melted chocolate, ensuring it’s completely covered. Gently tap the fork on the side of your bowl to let any excess chocolate drip off. Remember, the peanut butter mixture softens quickly at room temperature, so I find it easiest to work with just a few hearts at a time from the freezer. Place the chocolate-covered hearts onto the parchment-lined tray.
- Set the Chocolate: Refrigerate the tray until the chocolate has completely set.
- Store Your Treats: Store your finished chocolate peanut butter hearts in the fridge for short-term storage or in the freezer for longer keeping.
If you are looking for other bakes and sweets, check out our other recipes!
Troubleshooting Common Chocolate Peanut Butter Heart Problems
Even with the best intentions, sometimes things don’t go exactly as planned. Don’t worry, I’ve got you covered with solutions for common issues.
- Peanut Butter Mixture Too Dry or Too Oily: If your mixture seems too dry and crumbly, add a tiny bit more melted butter, a teaspoon at a time, until it comes together. If it feels too oily, you might have a natural peanut butter that separates easily. Stir it very thoroughly, and if it’s still too oily, you can try gradually mixing in a tablespoon or two more of powdered sugar to absorb some of the excess oil.
- Seized Chocolate: If your chocolate seizes (becomes thick and clumpy), it’s usually due to a small amount of water getting into it. Don’t despair! You can often fix it by stirring in a teaspoon or two of a neutral oil (like vegetable or canola oil) or shortening, a little at a time, until it becomes smooth and dippable again.
- Chocolate Too Thick or Too Thin: For chocolate that’s too thick, stir in a teaspoon of vegetable oil or melted coconut oil until it reaches your desired dipping consistency. If it’s too thin, it might need more time to set up, or you can try chilling it slightly. For candy coating, it generally has a good consistency right out of the package if melted properly.
- Ideal Chocolate Melting Temperatures: Generally, for milk chocolate, aim for around 105-110°F (40-43°C), and for semi-sweet or dark chocolate, around 115-120°F (46-49°C). Candy coating is typically melted at a lower temperature, often around 110-115°F (43-46°C), and you don’t need to temper it. Always follow the specific package instructions for your chosen chocolate or coating.
Delicious Variations for Your Chocolate Peanut Butter Valentine’s Hearts
Want to jazz up these classic hearts? I love experimenting with different flavors and decorations!
| Variation | Description | Decorative Ideas |
|---|---|---|
| Salted Caramel Swirl | Swirl a layer of caramel sauce into the peanut butter mixture before chilling. | Drizzle with more caramel or sea salt flakes before the chocolate sets. |
| Dark Chocolate Raspberry | Add a teaspoon of raspberry extract to the peanut butter filling. Use dark chocolate for coating. | Top with freeze-dried raspberry pieces or a raspberry drizzle. |
| Cookies and Cream | Crush about ½ cup of chocolate sandwich cookies and mix them into the peanut butter filling. | Sprinkle crushed cookies on top of the chocolate before it sets. |
| Peanut Butter Cup Style | Use milk chocolate for coating and add a tiny pinch of extra salt to the peanut butter filling. | Add a miniature peanut butter cup candy on top of each heart before it sets. |
| Spicy Chocolate | Mix a pinch of cayenne pepper or chili powder into the melted chocolate for a little heat. | Dust with a tiny bit of chili powder or edible gold luster dust. |
How to Store Your Chocolate Peanut Butter Valentine’s Hearts
Proper storage is key to keeping these treats tasting their best.
For short-term storage, I keep my chocolate peanut butter hearts in an airtight container in the refrigerator. They’ll stay delicious for about 1-2 weeks this way. Make sure to place parchment paper between layers if you stack them to prevent sticking.
If you want to make them further in advance or just have some to enjoy later, freezing is a great option. Place the chocolate-covered hearts on a parchment-lined tray and freeze them until solid. Once firm, transfer them to an airtight container or a heavy-duty freezer bag. They can be stored in the freezer for up to 2-3 months. Thaw them in the refrigerator before enjoying.
Gifting & Presentation Ideas
These hearts are absolutely perfect for gifting to your loved ones! I find that simple, elegant packaging makes them feel extra special. For another easy no-bake treat, consider Easy No-Bake Christmas Cheesecake Bites Recipe.
- Clear Cellophane Bags: Bunch them up with a festive ribbon for a classic look. You can find these easily online.
- Small Bakery Boxes: Line a small cardboard bakery box with tissue paper and arrange the hearts inside. Add a personalized tag for an extra touch.
- Mason Jars: Layer the hearts in a clean mason jar and tie a ribbon around the lid.
- Valentine’s Day Tins: These are often available seasonally and make for beautiful, reusable gift containers.
I love these clear cellophane treat bags and these cute heart-shaped bakery boxes that I found on Amazon.
Allergy-Friendly Substitutions
Navigating allergies or dietary preferences is important, and thankfully, these hearts are quite adaptable!
| Ingredient | Substitution Options | Notes |
|---|---|---|
| Peanut Butter | Almond Butter, Sunflower Seed Butter, Tahini, Nutella, Biscoff Spread, Soy Nut Butter | Ensure the consistency is similar to creamy peanut butter. Natural nut butters may require adjustment with the dry ingredients. |
| Unsalted Butter | Dairy-Free Butter Sticks, Coconut Oil (refined for no coconut flavor) | Use a good quality dairy-free butter that mimics the texture of real butter. |
| Chocolate (Dairy) | Dairy-Free Chocolate Chips, Vegan Chocolate Coating | Always check labels to ensure they are truly dairy-free or vegan. Brands like Enjoy Life are excellent options. |
| Powdered Sugar (Vegan) | Organic Powdered Sugar (many brands are vegan, check labels) | Some powdered sugars contain bone char. Organic versions are typically safe for vegans. |
FAQs about Chocolate Peanut Butter Valentine’s Hearts
I get asked a lot about making these, so here are answers to some common questions!
Can I use crunchy peanut butter?
Yes, you absolutely can! Crunchy peanut butter will add a nice texture to the filling, but make sure to press it down very firmly into the pan so it holds its shape when cut.
What if I don’t have heart-shaped cutters?
No problem! You can use any small cookie cutter shape you have on hand, or even just cut the chilled peanut butter slab into small squares or rectangles.
My chocolate is streaky, what did I do wrong?
This usually means the chocolate wasn’t tempered correctly, or it cooled too quickly. For candy melts, this is less of an issue as they are formulated to set up easily. If using real chocolate, ensure it’s tempered properly for a smooth, glossy finish.
Can I make the filling ahead of time?
Yes, you can prepare the peanut butter filling and press it into the dish, then wrap it tightly and refrigerate it for a day or two before cutting and dipping.
Conclusion
Making these Chocolate Peanut Butter Valentine’s Hearts has become a cherished tradition for me, and I truly hope it becomes one for you too. They’re a perfect blend of nostalgic flavors and festive charm, and the process of making them is just as rewarding as enjoying the final product. They’re proof that delicious, heartfelt treats don’t need to be complicated.
I’d love to hear if you give this recipe a try! Have you made them before? Did you try any of the variations? Please share your thoughts, questions, or your own special Valentine’s baking stories in the comments below! Your feedback truly makes my day.
For more recipes, follow us on Pinterest.