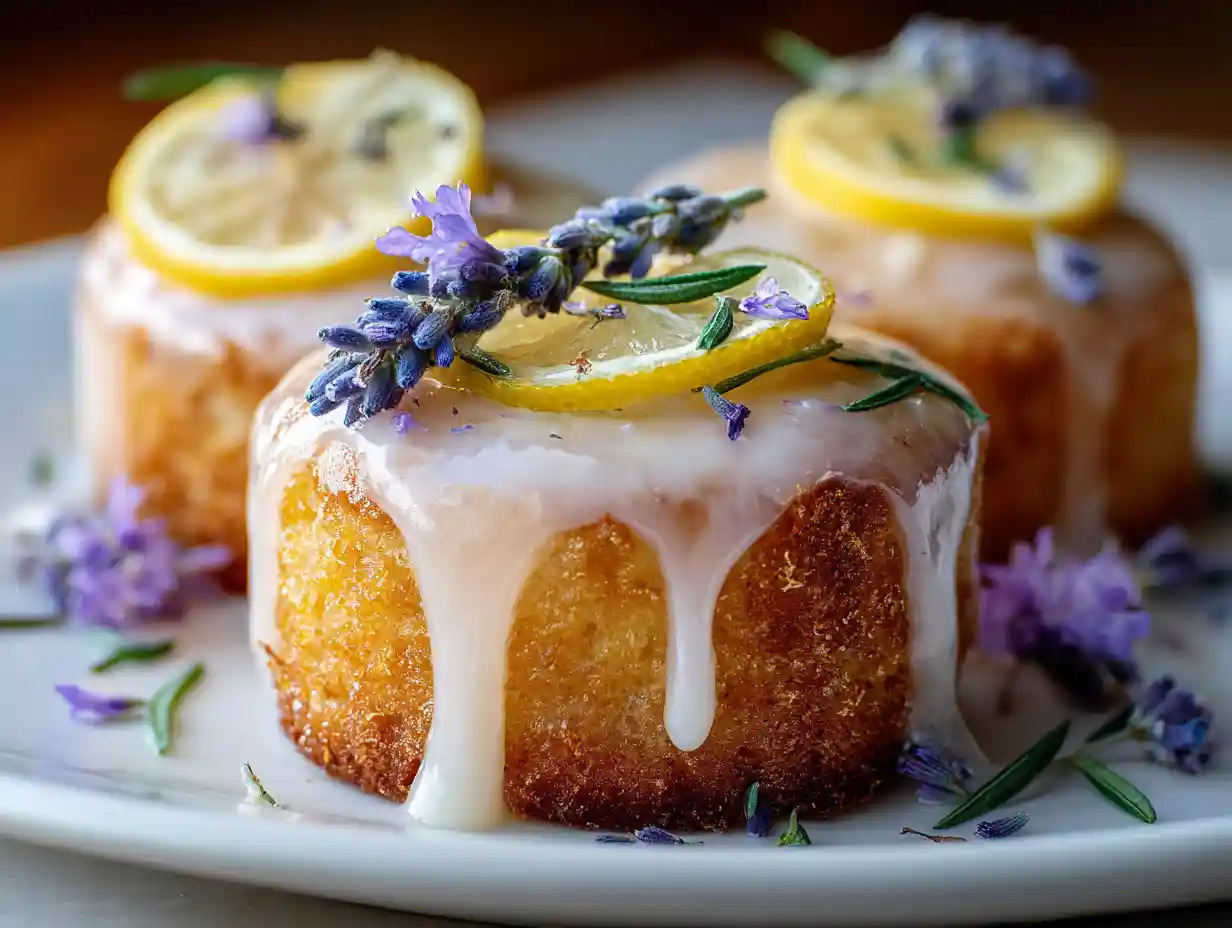
Mini Lemon Cakes With Lavender Glaze: A Sweet Escape
There are some flavor combinations that just feel like a hug for your soul. For me, that’s the perfect pairing of bright, zesty lemon with the subtle, calming floral notes of lavender. It instantly transports me back to sunny afternoons spent in my grandmother’s garden, the air thick with the scent of blooming flowers and a hint of citrus.
That’s why I’m so thrilled to share these Mini Lemon Cakes With Lavender Glaze with you today. They capture that same feeling of sweet escape, and the best part is, they’re surprisingly simple to whip up for any occasion.
Table of Contents
Mini Lemon Cakes With Lavender Glaze
Ingredients
Equipment
Method
- Preheat your oven to 350℉ (175℃). Generously grease and flour your chosen mini cake pans. This step is crucial for preventing cakes from sticking, especially in intricate molds.
- Melt the butter in a small microwave-safe bowl or a small saucepan on the stove. Let it cool slightly before proceeding.
- In a medium mixing bowl, whisk together the all-purpose flour and baking powder until well combined. Set this dry mixture aside.
- In the bowl of a food processor, combine the sugar and lemon zest. Pulse 4-5 times. This helps release the lemon oils from the zest for a more intense flavor. Add the lemon juice, eggs, and vanilla extract, then pulse a few times more just to combine.
- Whisk the slightly cooled melted butter to ensure the milk solids are fully blended back in. While the food processor is running on low, slowly drizzle in the butter.
- Now, gently fold the liquid mixture from the food processor into the flour mixture. Mix only until just combined; be careful not to overmix, as this can lead to tough cakes. Spoon the batter into your prepared mini cake pans, filling each about 2/3 full.
- Bake at 350℉ (175℃). The baking time will vary significantly depending on the size and type of your mini cake pans. For mini Bundts or muffin tins, start checking around 15-20 minutes. For mini loaf pans, it might take up to 25 minutes. A toothpick inserted into the center of a cake should come out clean when they’re ready. Keep a close eye to prevent overbaking, which can dry them out.
- Once baked, carefully remove the mini cakes from the oven. Let them cool in their pans on a wire rack for about 5-10 minutes. Then, gently invert them onto the wire rack to cool completely.
- While the cakes cool, prepare the glaze. In a small bowl, whisk together the powdered sugar and lavender extract. Add the milk, one tablespoon at a time, whisking until you reach your desired drizzling consistency. If you’d like to tint the glaze, now is the time to add a touch of purple sweet potato powder or food coloring and mix until smooth.
- Once the mini cakes are entirely cool, arrange them on your serving plate or place the wire rack over parchment paper (to catch drips). Drizzle the lavender glaze over each cake, letting it drip down the sides. You can also dip the tops of the cakes into the glaze for a thicker coating.
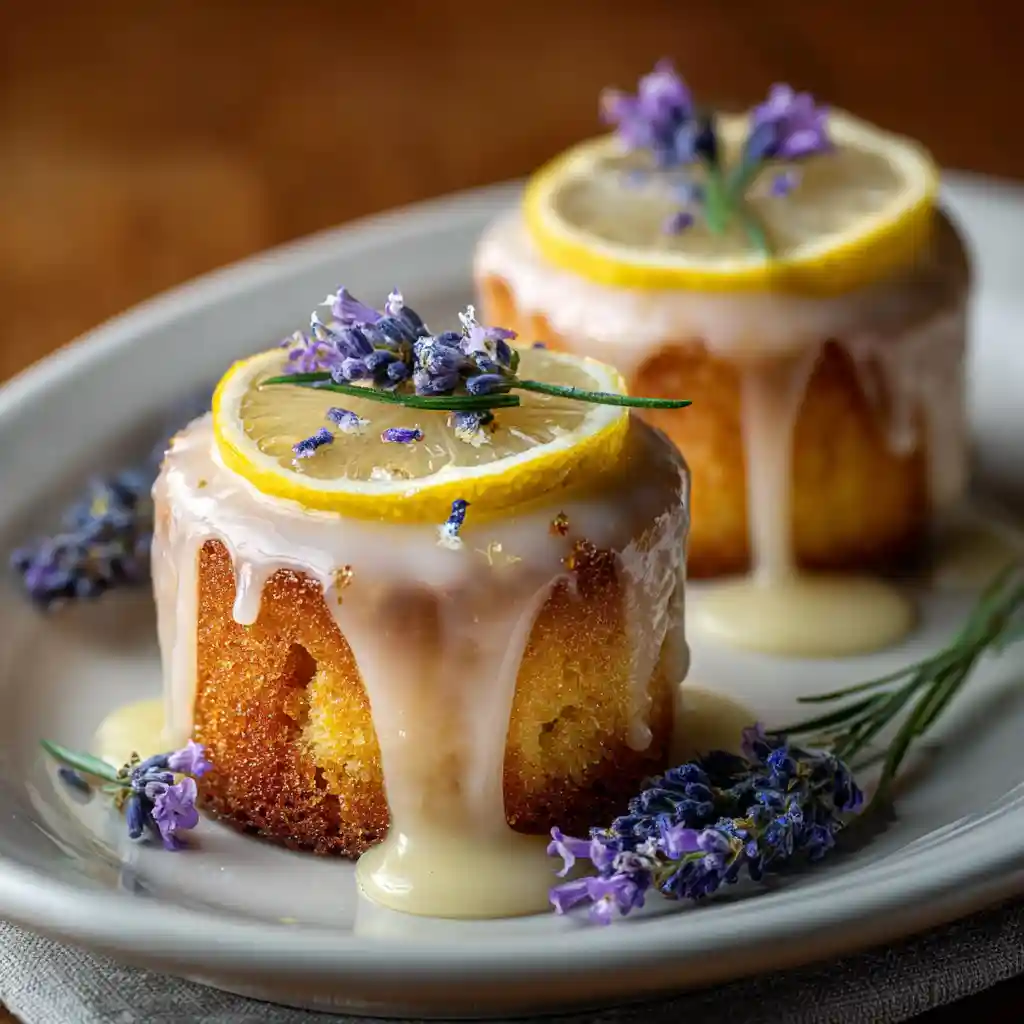
- Finally, decorate with delicate lemon slices and fresh lavender blossoms, if using. These optional touches add a beautiful visual appeal and an extra hint of their delightful flavors.
Tried this recipe?
Let us know how it was!Why You’ll Adore These Mini Lemon Cakes
These aren’t just any mini cakes; they’re a little bite of sunshine and serenity, perfectly portioned for pure delight.
- Perfect Portion Control: Each mini cake offers an individual serving of pure joy, making them ideal for parties or when you just want a sweet treat without the indulgence of a full slice.
- Elegant Presentation: Their petite size and beautiful glaze make them look incredibly sophisticated, turning any gathering into a special occasion.
- Effortless Serving: Forget slicing and serving a large cake. These mini gems are ready to be enjoyed straight from the plate, a real time-saver.
- Gift-Giving Delight: Packaged nicely, they make a thoughtful and delicious homemade gift that’s sure to impress.
Essential Equipment for Baking Mini Lemon Cakes
Beyond the basic pantry staples, a few key tools can make baking these mini cakes even more enjoyable and successful.
- Microplane Zester: This is my absolute favorite tool for zesting lemons. It effortlessly grates the zest without touching the bitter pith, ensuring maximum lemon flavor.
- Stand Mixer or Hand Mixer: While you can mix the batter by hand, a stand mixer or hand mixer makes creaming the butter and sugar, and incorporating the eggs, so much easier and quicker.
- Cooling Rack: Essential for allowing air to circulate around the cakes after baking, ensuring they cool evenly and don’t become soggy.
- Fine-Mesh Strainer: Perfect for sifting your dry ingredients for a lighter cake and for ensuring your glaze is perfectly smooth.
- Mini Cake Pan Options: You have choices here! Mini Bundt molds, standard muffin tins (for a simple cup-cake style), mini loaf pans, or silicone molds all work beautifully. Choose the one that best suits your desired final look.
Ingredients for Your Delightful Mini Lemon Cakes with Lavender Glaze
Gathering your ingredients is the first step toward baking bliss. For the best results, ensure your butter and eggs are at room temperature; this helps them emulsify properly for a tender cake crumb.
- 1 cup butter, softened
- 1 ¾ cup all-purpose flour
- 1 teaspoon baking powder
- 1 ½ cup sugar
- 2 tablespoons lemon zest
- 2 teaspoons lemon juice
- 4 large eggs, room temperature
- 1 ½ teaspoons vanilla extract
For the Lavender Glaze:
- 1 cup powdered sugar
- ½ teaspoon culinary-grade lavender extract (it’s crucial to use culinary grade to avoid a soapy taste)
- 2-3 tablespoons milk
- Purple sweet potato powder or food coloring (optional, for tinting)
- Lemon slices and/or fresh organic lavender blossoms for decoration (optional)
A quick note on the lavender extract: always opt for a culinary-grade product. This ensures the flavor is delicate and aromatic, not overpowering or chemical-tasting. If you’re sensitive to floral notes, start with a smaller amount and add more to taste.
How to Make Mini Lemon Cakes with Lavender Glaze
Transforming a loaf cake recipe into these delightful mini cakes is simpler than you might think! The key is adjusting the baking pan and, most importantly, the baking time.
- Preheat your oven to 350℉ (175℃). Generously grease and flour your chosen mini cake pans. This step is crucial for preventing cakes from sticking, especially in intricate molds.
- Melt the butter in a small microwave-safe bowl or a small saucepan on the stove. Let it cool slightly before proceeding.
- In a medium mixing bowl, whisk together the all-purpose flour and baking powder until well combined. Set this dry mixture aside.
- In the bowl of a food processor, combine the sugar and lemon zest. Pulse 4-5 times. This helps release the lemon oils from the zest for a more intense flavor. Add the lemon juice, eggs, and vanilla extract, then pulse a few times more just to combine.
- Whisk the slightly cooled melted butter to ensure the milk solids are fully blended back in. While the food processor is running on low, slowly drizzle in the butter.
- Now, gently fold the liquid mixture from the food processor into the flour mixture. Mix only until just combined; be careful not to overmix, as this can lead to tough cakes. Spoon the batter into your prepared mini cake pans, filling each about 2/3 full.
- Bake at 350℉ (175℃). The baking time will vary significantly depending on the size and type of your mini cake pans. For mini Bundts or muffin tins, start checking around 15-20 minutes. For mini loaf pans, it might take up to 25 minutes. A toothpick inserted into the center of a cake should come out clean when they’re ready. Keep a close eye to prevent overbaking, which can dry them out.
- Once baked, carefully remove the mini cakes from the oven. Let them cool in their pans on a wire rack for about 5-10 minutes. Then, gently invert them onto the wire rack to cool completely.
- While the cakes cool, prepare the glaze. In a small bowl, whisk together the powdered sugar and lavender extract. Add the milk, one tablespoon at a time, whisking until you reach your desired drizzling consistency. If you’d like to tint the glaze, now is the time to add a touch of purple sweet potato powder or food coloring and mix until smooth.
- Once the mini cakes are entirely cool, arrange them on your serving plate or place the wire rack over parchment paper (to catch drips). Drizzle the lavender glaze over each cake, letting it drip down the sides. You can also dip the tops of the cakes into the glaze for a thicker coating.
- Finally, decorate with delicate lemon slices and fresh lavender blossoms, if using. These optional touches add a beautiful visual appeal and an extra hint of their delightful flavors.
Maya’s Pro Tips for Perfect Mini Lemon Cakes
Baking is a bit of science and a bit of art, and I’ve learned a few tricks over the years that I want to share to help you achieve mini cake perfection.
- Room Temperature is Key: Using room temperature butter and eggs is vital. Softened butter creams better with sugar, creating air pockets that lead to a lighter cake. Room temperature eggs emulsify more easily into the batter, preventing a greasy texture.
- Don’t Overmix: Once you combine the wet and dry ingredients, mix only until the flour streaks disappear. Overmixing develops the gluten in the flour, resulting in a tough, dense cake.
- Zesting Efficiently: For the best lemon flavor without bitterness, use a microplane or a fine grater. Rotate the lemon as you zest, and stop when you reach the white pith underneath the yellow peel.
- Even Baking: Ensure your oven temperature is accurate. If you find your oven bakes unevenly, consider rotating your cake pans halfway through baking. Also, avoid overcrowding your pans; give the cakes a little space for air to circulate.
- Demolding Like a Pro: For intricate molds, ensuring they are well-greased and floured is paramount. Sometimes, gently tapping the bottom of the pan can help release stubborn cakes. If using silicone molds, they usually pop out easily once slightly cooled.
Mastering the Lavender Glaze for Your Mini Cakes
The glaze is the crowning glory of these mini cakes, adding a touch of elegance and an extra layer of flavor. Achieving the perfect consistency and taste is easy with a few pointers.
- Consistency Control: If your glaze is too thick, add milk a teaspoon at a time until it reaches a drizzling consistency. If it’s too thin, add more powdered sugar, a tablespoon at a time, until it thickens up. You want it pourable but not so thin that it runs off the cake completely.
- Drizzling vs. Dipping: For a delicate drizzle, use a spoon or a piping bag with a small tip. For a more substantial coating, you can dip the tops of the cooled cakes directly into the glaze.
- Preventing That “Soapy” Flavor: The common mistake with lavender is using too much or using a non-culinary grade extract. Always start with the recommended amount (½ teaspoon is a good starting point for this recipe) and taste. You can always add a tiny bit more if needed, but you can’t take it away. Ensure you are using an extract specifically made for baking or culinary use.
- Achieving Beautiful Color: For that lovely purple hue, natural options like purple sweet potato powder work wonderfully and add a hint of earthy sweetness. Alternatively, a few drops of liquid food coloring can be used. Add the coloring gradually until you achieve your desired shade.
Storage and Make-Ahead Magic for Your Mini Lemon Cakes
One of the best things about these mini cakes is that they hold up beautifully, making them perfect for planning ahead.
- Unglazed Cakes: Once completely cooled, unglazed mini cakes can be stored in an airtight container at room temperature for up to 3 days. They can also be frozen, well-wrapped, for up to 2 months.
- Glazed Cakes: Glazed cakes are best stored uncovered on a plate or in a cake carrier at room temperature for up to 2 days. The glaze needs to set completely, so avoid stacking them. If storing longer, you might want to refrigerate them, but be aware that refrigeration can sometimes dry out cakes.
- Glaze Storage: The lavender glaze can be made ahead and stored in an airtight container in the refrigerator for up to a week. Before using, let it come to room temperature and whisk vigorously. If it’s too thick, add a tiny bit of milk to thin it out.
- Thawing and Refreshing: To refresh frozen cakes, let them thaw at room temperature. If they seem a little dry, you can brush them lightly with a simple syrup (equal parts sugar and water, heated until dissolved and then cooled) before glazing.
Variations & Customizations for Your Mini Lemon Cakes
While I adore the lemon and lavender combination, these mini cakes are wonderfully versatile. Feel free to play around with different flavors!
| Category | Variation Idea | Notes |
|---|---|---|
| Cake Flavor | Poppy Seed Lemon Cakes | Add 1-2 tbsp poppy seeds to the batter for texture. |
| Orange or Lime Cakes | Substitute lemon zest and juice with orange or lime for a different citrus profile. | |
| Glaze Flavor | Rosewater Glaze | Replace lavender extract with ½ tsp rosewater for a delicate floral note. |
| Plain Lemon Glaze | Omit lavender extract for a classic, bright lemon glaze. | |
| Lemon Cream Cheese Glaze | Combine cream cheese, powdered sugar, lemon juice, and a splash of milk for a richer topping. | |
| Dietary Needs | Gluten-Free Option | Use a 1:1 gluten-free baking flour blend (ensure it contains xanthan gum). |
| Dairy-Free Substitutions | Use plant-based butter and milk alternatives. |
Serving Suggestions & Perfect Occasions
These Mini Lemon Cakes with Lavender Glaze are truly little jewels, perfect for elevating any gathering or simply making an ordinary day feel special.
- Afternoon Tea: They are the quintessential treat for a sophisticated afternoon tea service, paired with delicate finger sandwiches.
- Bridal & Baby Showers: Their elegant appearance and delightful flavors make them a stunning addition to the dessert table at showers.
- Mother’s Day or Easter Brunch: Brighten up your holiday table with these cheerful, flavorful cakes.
- Weekend Treat: Enjoy them with your morning coffee or as an after-dinner indulgence with a cup of herbal tea.
- Simple Get-Togethers: They’re perfect for a casual brunch with friends or a garden party.
To complement their flavors, I love serving them with a pot of Earl Grey tea, a delicate chamomile, or even a crisp sparkling rosé for a touch of festivity.
FAQs About Mini Lemon Cakes With Lavender Glaze
I know you might have a few questions as you embark on baking these delightful treats, so here are some answers to common queries.
Why are my cakes dense?
This is often due to overmixing the batter or using ingredients that weren’t at room temperature. Ensure you mix just until combined and that your butter and eggs are soft.
My cakes are dry, what happened?
Overbaking is the usual culprit. Mini cakes bake quickly, so keep a close eye on them and test for doneness with a toothpick as soon as they appear golden.
My glaze is too thin or too thick. How do I fix it?
As mentioned, add more powdered sugar if it’s too thin, and a tiny bit of milk or lemon juice if it’s too thick. Consistency is key!
How can I avoid that “soapy” lavender taste?
Always use culinary-grade lavender extract and start with a smaller amount than you think you need. You can always add more, but you can’t take it away.
What kind of lavender should I use?
For the extract, culinary grade is essential. If you’re using fresh lavender blossoms for decoration, ensure they are organic and specifically labeled as edible or culinary lavender, as non-edible varieties may be treated with pesticides.
How do I choose the best lemons?
Look for lemons that are heavy for their size, indicating they are juicy. The skin should be bright yellow and relatively smooth, though slightly bumpy skin can also be very fragrant.
Sweet Endings: Your Turn to Bake!
I truly hope you enjoy baking and, more importantly, savoring these Mini Lemon Cakes With Lavender Glaze. They are a little slice of happiness, perfect for sharing with loved ones or treating yourself to a moment of sweet indulgence. The blend of bright lemon and calming lavender is simply magical, and I can’t wait for you to experience it.
Now it’s your turn! I’d be absolutely delighted if you’d share your baking adventures in the comments below. Did you try a fun variation? Do you have any other questions? And if you share photos of your mini cakes on social media, please tag me and use the hashtag #DelishScriptMiniCakes so I can see your beautiful creations! Happy baking!