Discover the Magic of the Best Irish Soda Bread Recipe!
There’s something incredibly comforting about the smell of freshly baked bread filling my kitchen. It instantly makes my home feel cozier and more inviting.
Today, I’m so excited to share my absolute favorite Irish Soda Bread recipe. It’s a simple, no-fuss bread that comes together in about an hour, perfect for a quick treat or a delicious addition to any meal. If you’re looking for an easy, rewarding baking project, you’ve found it.
Table of Contents
The Ultimate Authentic Irish Soda Bread Recipe
Ingredients
Equipment
Method
- Preheat oven to 400°F (204°C). Prepare your baking pan: line a baking sheet with parchment paper or a silicone mat, grease a 10-12 inch cast iron skillet (no need to preheat), grease a 9-10 inch cake pan or pie dish, or grease a 5-quart (or larger) Dutch oven and line with parchment paper. If using a Dutch oven, bake with the lid off.
- In a small bowl, whisk together the buttermilk and egg (if using). Set aside. In a large bowl, whisk together the flour, sugar, baking soda, and salt. Cut in the cold butter using a pastry blender, fork, or your fingertips until the mixture resembles coarse crumbs with pea-sized pieces of butter. Stir in the raisins, if using.
- Pour the buttermilk mixture into the dry ingredients. Gently fold with a spatula or wooden spoon until the dough is just combined and too stiff to stir.
- Turn the crumbly dough onto a lightly floured surface. With floured hands, gently work the dough into a ball, about 30 seconds, until all the flour is moistened. Add a tiny bit more flour if the dough is too sticky.
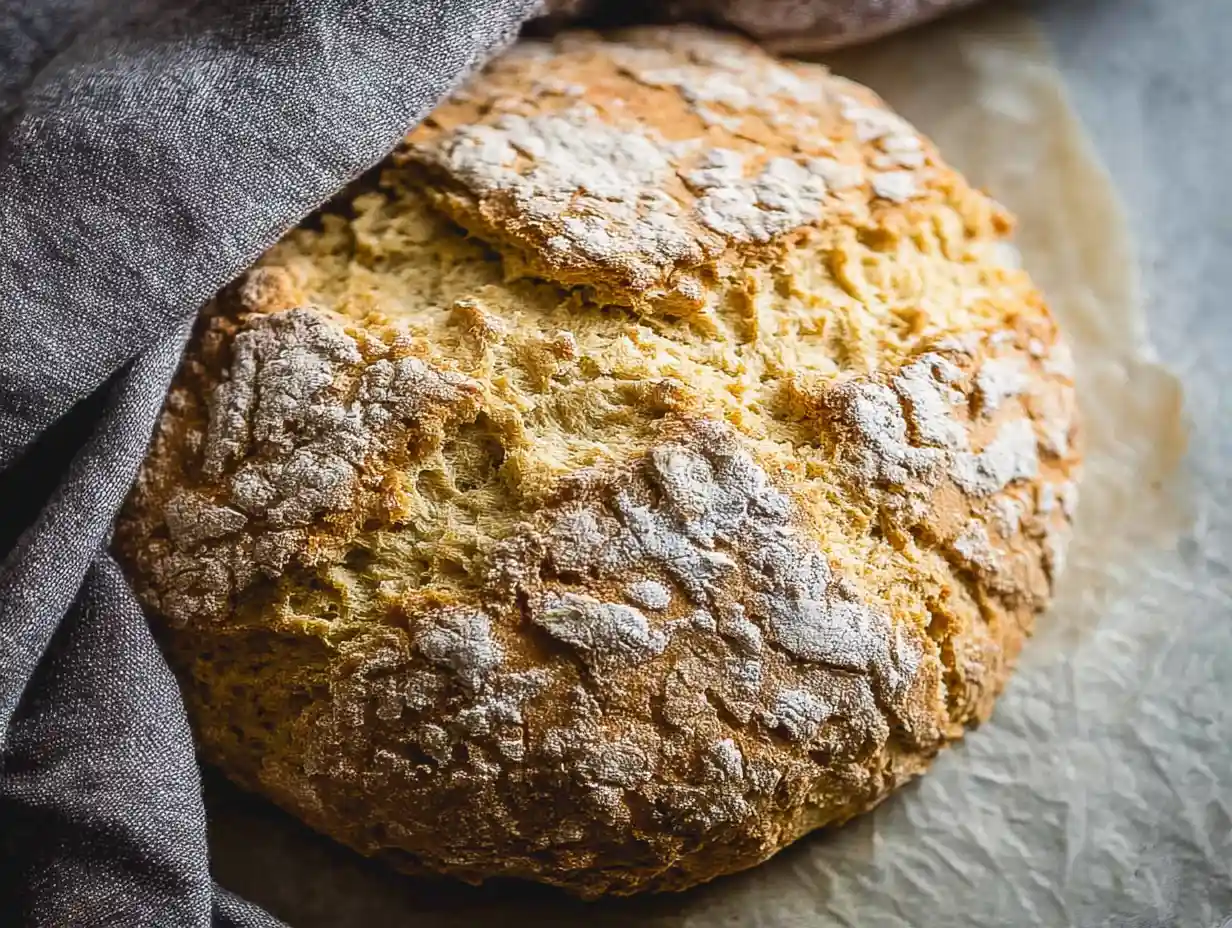
- Transfer the dough ball to your prepared pan or skillet. Using a very sharp knife or bread lame, score the top with a deep slash or an X, about 1/2 inch deep.
- Bake for 45-55 minutes, or until golden brown and a thermometer inserted into the center reads 195°F (90°C). If the top is browning too quickly, loosely tent it with aluminum foil.
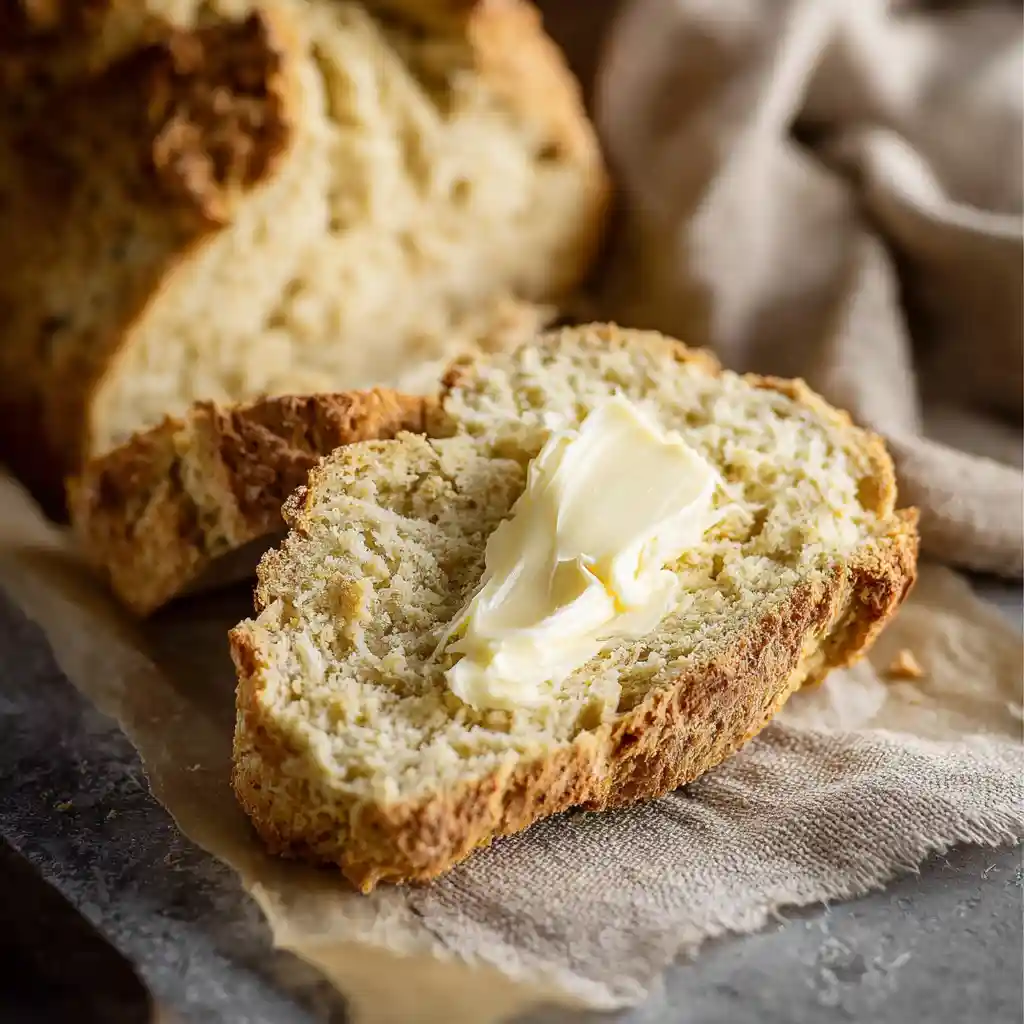
- Remove from the oven, let cool in the pan for 10 minutes, then transfer to a wire rack to cool further. Slice and serve warm, at room temperature, or toasted.
Notes
Tried this recipe?
Let us know how it was!Why You’ll Love This Easy Irish Soda Bread Recipe
I developed this recipe to be incredibly approachable, even if you’ve never baked bread before. Here’s why I think you’ll fall in love with it:
- Quick and Simple: You can have a warm loaf of soda bread ready in about an hour from start to finish.
- Everyday Ingredients: It uses pantry staples you likely already have on hand, making it perfect for a spontaneous bake.
- Beginner-Friendly: No kneading, no yeast, and minimal fuss make this a truly forgiving and easy recipe for anyone to master.
- Deliciously Versatile: It’s wonderful on its own, but also a fantastic base for your favorite spreads or a side to hearty stews.
Ingredients You’ll Need for Authentic Irish Soda Bread
Gathering these few ingredients is the first step to baking a perfect loaf.
- 1 and 3/4 cups (420ml) buttermilk\*: This is the key to the tender crumb and slight tang in soda bread. If you don’t have buttermilk, I’ll share a simple substitution below.
- 1 large egg (optional, see note): The egg adds a little richness and helps bind the dough, but it’s perfectly fine to omit if you prefer.
- 4 and 1/4 cups (531g) all-purpose flour (spooned & leveled), plus more for your hands and counter: This forms the base of our bread. Spooning and leveling ensures you don’t end up with too much flour, which can make the bread dense.
- 3 Tablespoons (38g) granulated sugar: Just a touch of sweetness to balance the flavors.
- 1 teaspoon baking soda: This is the “soda” in soda bread. It works with the buttermilk to leaven the bread, making it rise.
- 1 teaspoon salt: Essential for bringing out all the flavors.
- 5 Tablespoons (71g) unsalted butter, cold and cubed\*: Cold butter is important here. It creates little pockets of steam as it bakes, contributing to a lighter texture.
- optional: 1 cup (150g) raisins: A classic addition that adds bursts of sweetness. Feel free to skip them if they aren’t your favorite.
Ingredient Substitutions & Variations
Sometimes you need a little flexibility in the kitchen, and that’s perfectly okay! Here are some common ingredient swaps and fun variations you can try.
| Ingredient | Substitution Options |
|---|---|
| Buttermilk | 1 ¾ cups milk + 1 ¾ tablespoons lemon juice or white vinegar |
| All-Purpose Flour | Whole wheat flour (adjust amount, may require a touch more liquid) |
| Raisins | Dried cranberries, currants, caraway seeds, or other dried fruits/seeds |
For variations, I love adding a teaspoon of caraway seeds directly into the dry ingredients for a subtle savory note, or even a bit of fresh rosemary if I’m serving it with a hearty soup.
When adding dried fruits like raisins or cranberries, consider exploring other delicious baked goods, such as Wonderful Christmas Cranberry Bars Recipe.
Step-by-Step Instructions: Making the Perfect Irish Soda Bread
Follow these steps, and you’ll have a beautiful loaf in no time.
- Preheat oven to 400°F (204°C). There are options for the baking pan. Use a regular baking sheet and line with parchment paper or a silicone baking mat (bread spreads a bit more on a baking sheet), or use a seasoned 10-12 inch cast iron skillet (no need to preheat the cast iron unless you want to), or grease a 9-10 inch cake pan or pie dish. You can also use a 5 quart (or higher) dutch oven. Grease or line with parchment paper. If using a dutch oven, bake the bread with the lid off.
- Whisk the buttermilk and egg together. Set aside. Whisk the flour, granulated sugar, baking soda, and salt together in a large bowl. Cut in the butter using a pastry cutter, a fork, or your fingers. Mixture is very heavy on the flour, but do your best to cut in the butter until the butter is pea-sized crumbs. Stir in the raisins. Pour in the buttermilk/egg mixture. Gently fold the dough together until dough it is too stiff to stir. Pour crumbly dough onto a lightly floured work surface. With floured hands, work the dough into a ball as best you can, then knead for about 30 seconds or until all the flour is moistened. If the dough is too sticky, add a little more flour.
- Transfer the dough to the prepared skillet/pan. Using a very sharp knife or bread lame, score the dough with a slash or X about 1/2 inch deep. (“Score” = shallow cut.)
- Bake until the bread is golden brown and center appears cooked through, about 45-55 minutes. Loosely tent the bread with aluminum foil if you notice heavy browning on top. For a more accurate test, the bread is done when an instant-read thermometer reads the center of the loaf as 195°F (90°C).
- Remove from the oven and allow bread to cool for 10 minutes, and then transfer to a wire rack. Serve warm, at room temperature, or toasted with desired toppings/spreads.
- Cover and store leftover bread at room temperature for up to 2 days or in the refrigerator for up to 1 week. I usually wrap it tightly in aluminum foil for storing.
The Secret to Success: Essential Tips for Irish Soda Bread
A few little tricks can make all the difference in achieving a perfect loaf.
- Don’t Overmix: Overmixing the dough develops the gluten too much, which can lead to a tough, dense bread. Mix just until everything comes together.
- Use Fresh Baking Soda: Baking soda loses its potency over time. Make sure yours is fresh for the best rise. The leavening power of baking soda is crucial for a good rise.
- Handle Dough Gently: Soda bread is a quick bread, meaning it relies on chemical leaveners, not yeast. Gentle handling keeps the texture light and tender.
- Score Properly: The traditional cross-shaped score isn’t just for looks; it helps the bread cook evenly and allows steam to escape.
Troubleshooting Common Irish Soda Bread Problems
Even the best bakers encounter hiccups! Here are solutions to some common soda bread issues.
- Flat Loaf: This is usually due to old baking soda or overmixing the dough, which can deflate the leavening agents. Ensure your baking soda is fresh and mix the dough as little as possible.
- Dense Texture: Similar to a flat loaf, this can be caused by overmixing or not enough liquid. Make sure to measure your flour correctly and handle the dough gently.
- Gummy Interior: This often means the bread wasn’t baked long enough. Use a thermometer to check for an internal temperature of 195°F (90°C) for a fully cooked center.
Serving Suggestions: What to Eat with Your Irish Soda Bread
This bread is wonderfully versatile. I love it in so many ways:
- Simply Buttered: A warm slice with a generous smear of good quality butter is classic for a reason.
- With Jam or Honey: The slightly tangy bread is a perfect canvas for sweet preserves.
- Alongside Soup or Stew: It’s the ideal accompaniment to a hearty beef stew, a creamy potato soup, or a rich lentil soup. Many hearty stews are perfect candidates for a side of bread like this, and you can find similar comforting recipes within the main dishes category.
- For Breakfast: Toast a slice and top it with cream cheese, smoked salmon, or a fried egg.
Frequently Asked Questions
How do I store leftover Irish Soda Bread?
I find the best way to store it is to wrap it tightly in aluminum foil once it has completely cooled. This helps keep it from drying out. It will stay fresh at room temperature for about two days, or you can store it in the refrigerator for up to a week.
Can I freeze Irish Soda Bread?
Yes, you absolutely can! Once cooled, wrap the loaf tightly in plastic wrap, then in aluminum foil, or place it in a freezer-safe bag. It should keep well in the freezer for up to 2-3 months. Thaw at room temperature or gently reheat in a low oven.
Why is my Irish Soda Bread dense?
A dense texture is often the result of overmixing the dough. Soda bread relies on chemical leaveners, not yeast, so gentle handling is key. Mix just until the ingredients are combined, and avoid over-kneading. This is a key principle for quick breads like soda bread.
Can I make this recipe without buttermilk?
Yes! My favorite substitute is to mix 1 and 3/4 cups of milk with 1 and 3/4 tablespoons of lemon juice or white vinegar. Let it sit for about 5-10 minutes until it thickens slightly, and then use it as you would buttermilk.
Conclusion: Get Baking and Share Your Irish Soda Bread Success!
There you have it, my go-to Irish Soda bread recipe! I hope this inspires you to get into the kitchen and try it. It’s such a rewarding bread to bake, and the smell alone is worth it. I’d love to hear how yours turns out, or if you have any favorite ways to enjoy it. Please leave a comment below and share your baking adventures – I can’t wait to see what you create!
For more recipes, follow us on Pinterest.