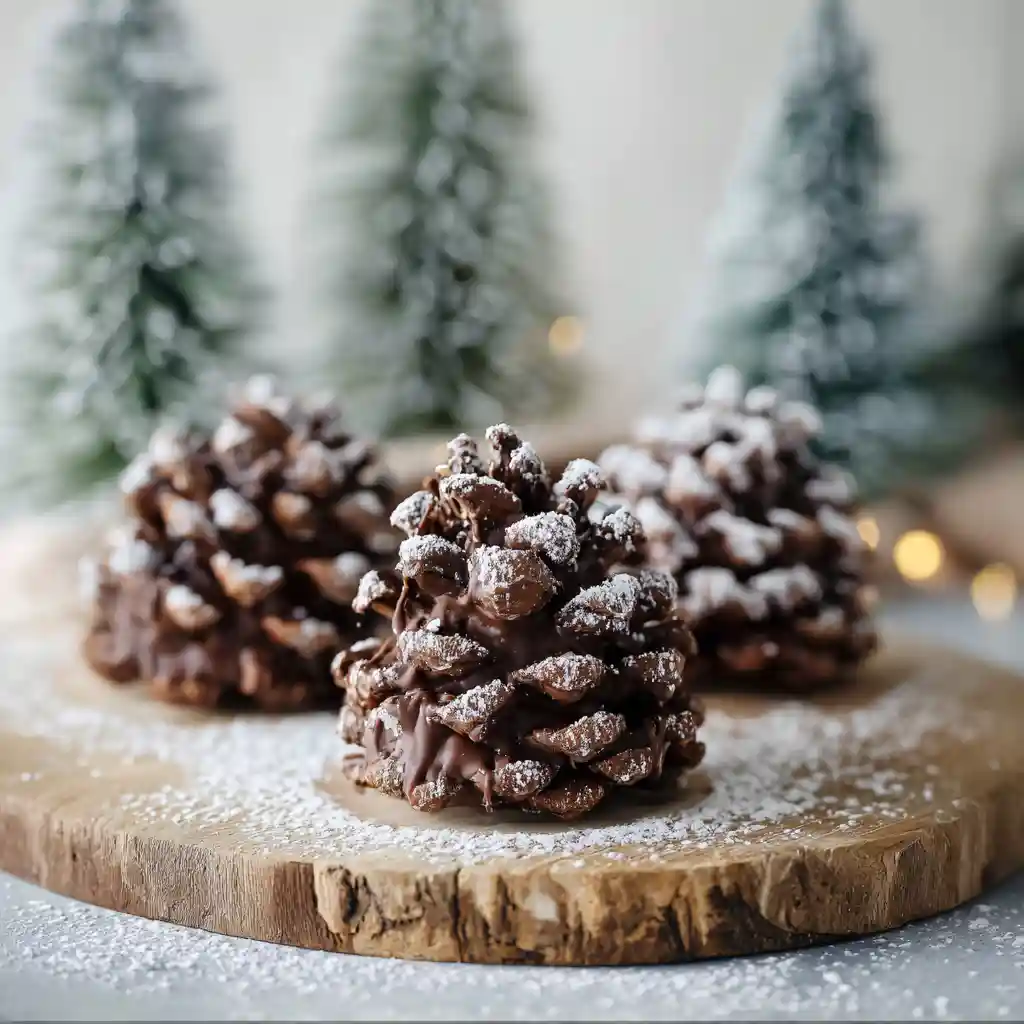
The holidays always bring back memories of our family gathered around the kitchen, experimenting with new recipes. One year, I decided to try something ambitious: Pinecone Truffles. These no-bake treats looked impressive, and I was excited to try my hand at them. They require a bit of chilling time, so plan accordingly! I’m excited to share my version of this Pinecone Truffles Recipe with you.
Table of Contents
Why You’ll Love This Pinecone Truffles Recipe
- Impressive Presentation: These truffles look like miniature pinecones, making them a show-stopping dessert for any occasion.
- No-Bake Recipe: Perfect for when you want a delicious treat without turning on the oven.
- Perfect for Gifting: These truffles make a thoughtful and beautiful homemade gift for friends and family.
- Customizable Flavors: You can easily adapt the flavors to suit your preferences, from peppermint to espresso.
Ingredients
- 1/2 cup whole raw almonds
- 1 1/2 cups sliced raw almonds
- 10 ounces dark chocolate chips (about 60% cacao)
- 1/2 cup heavy cream
- 1 tablespoon honey
- 1/2 teaspoon pure vanilla extract
- 1/4 teaspoon salt
- 1/3 cup Dutch process cocoa powder
Equipment
- Double boiler: This ensures the chocolate melts smoothly without burning. Alternatively, you can use a heatproof bowl set over a simmering pot of water.
- Lipped baking sheets: These are essential for roasting the almonds. The lip prevents them from sliding off.
- Blender or food processor: Used to grind the whole almonds into a coarse meal.
- Spoon: To scoop out the truffle mixture.
- Refrigerator: For chilling the truffle mixture.
Step-by-Step Instructions to Make Pinecone Truffles
- Preheat the oven to 350 degrees Fahrenheit. Evenly spread out the whole raw almonds on one lipped baking sheet, and the sliced raw almonds on another. Roast until very lightly deepened in color and fragrant, about 6-8 minutes for the sliced almonds and 10-12 minutes for the whole almonds.
- Grind the roasted WHOLE almonds in a blender or food processor until they reach a stage halfway between almond flour and almond butter. Set them aside.
- In the top of a double boiler, melt together the chocolate and cream until smooth, stirring constantly. Then remove from heat and stir in the ground roasted almond mixture, honey, vanilla, and salt until combined. Cover and place in the refrigerator for 90 minutes.
- Use a spoon to scoop out a roughly 2×1-inch cylinder of the truffle mixture. Form it into a egg shape that’s slightly skinner than an actual egg (aka the shape of a pinecone). Lightly roll it in the cocoa powder to make the exterior less sticky. Insert the roasted sliced almonds into the truffle at a low angle to mimic the scales of a pinecone. Repeat until you’ve used all the truffles + sliced almonds. Makes about a 18 pinecone truffles.
If you’re looking for another impressive dessert for the holidays, consider this Amazing Maple Pecan Pie Stuffed Cookies Recipe.
Shaping the Pinecone Truffles: A Visual Guide
- Scoop and Shape: Use a spoon to scoop a portion of the chilled truffle mixture. Gently roll it between your palms to form a cylinder, tapering one end slightly to resemble a pinecone shape.
- Cocoa Coating: Lightly roll the truffle in cocoa powder. This not only adds a delicious flavor but also makes the truffle less sticky to handle.
- Add the Scales: Starting at the base of the pinecone shape, gently press the sliced almonds into the truffle at a slight angle, overlapping each slice to mimic the scales of a pinecone.
- Complete the Cone: Continue adding almond slices, working your way up to the top of the truffle. Make sure the almond slices are securely attached, and the truffle resembles a realistic pinecone.
Troubleshooting Common Problems
My dough is too sticky:
If your truffle mixture is too sticky, it means it hasn’t chilled enough. Return it to the refrigerator for another 30 minutes, or until it reaches a firmer consistency. To prevent this, ensure you chill the mixture for the full 90 minutes.
My chocolate won’t set:
Make sure you are using good quality chocolate. If your chocolate doesn’t set properly, it may be due to humidity or temperature fluctuations. Ensure you melt the chocolate slowly and evenly in a double boiler, and avoid overheating it.
The scales are falling off:
This usually happens if the almond slices aren’t securely attached to the truffle. Make sure to gently but firmly press the almonds into the truffle, ensuring they adhere well. If the truffle is too soft, chill it for a bit longer before adding the almond slices.
Ingredient Sourcing & Quality
When it comes to chocolate, I always aim for the best quality I can find. For these truffles, I recommend using dark chocolate chips with about 60% cacao. This gives the truffles a rich, intense flavor that pairs perfectly with the almonds. Dark chocolate contains 50-90% cocoa solids, cocoa butter, and sugar, and its flavanols may help protect the heart [2]. You can explore more dessert options in our bakes & sweets category. As for the almonds, make sure they are fresh and raw. The roasting process will bring out their nutty flavor, adding another layer of complexity to the truffles.
Variations and Add-ins
| Variation | Substitution/Addition | Notes |
|---|---|---|
| Gluten-Free | Use gluten-free cookies/cereal. | Ensure all other ingredients are also certified gluten-free. |
| Vegan | Substitute dairy-free chocolate and plant-based cream. | Adjust sweetness as needed. |
| Peppermint | Add 1/2 teaspoon of peppermint extract. | Pairs well with dark chocolate. |
Serving & Presentation Ideas
These Pinecone Truffles are not only delicious but also visually stunning, making them perfect for serving at holiday parties or giving as gifts. I like to arrange them on a platter with some fresh greenery, like rosemary sprigs or pine needles, to enhance the pinecone effect. For gifting, package them in decorative boxes or cellophane bags tied with ribbon.
For a savory alternative, consider making this Ultimate Cranberry Salsa over Cream Cheese Appetizer for your party.
Tips and Tricks for the Best Pinecone Truffles Recipe
- Roast the Almonds Properly: Roasting the almonds brings out their flavor and gives them a nice crunch. Keep a close eye on them while they’re in the oven to prevent burning.
- Chill the Mixture Thoroughly: Chilling the truffle mixture for the recommended time is crucial for easy shaping.
- Work Quickly: Once the truffles are shaped, work quickly to add the almond slices before the truffle warms up too much.
Storage Instructions
To keep your Pinecone Truffles fresh, store them in an airtight container in the refrigerator. They will last for up to a week. For longer storage, you can freeze them for up to a month. Just make sure to thaw them in the refrigerator before serving.
Frequently Asked Questions
Can I use white chocolate?
Yes, you can use white chocolate, but the flavor profile will be quite different. White chocolate is much sweeter than dark chocolate, so you may want to reduce the amount of honey in the recipe.
How long will these last?
These truffles will last for up to a week in the refrigerator or up to a month in the freezer.
Can I make these ahead of time?
Absolutely! In fact, I recommend making them a day or two ahead of time to allow the flavors to meld together.
Conclusion
This Pinecone Truffles recipe is a delightful and easy way to impress your friends and family. With its stunning presentation and delicious flavor, it’s sure to be a hit at any holiday gathering. Don’t be intimidated by their fancy appearance; they are surprisingly simple to make. Now it’s your turn! I would love to hear how your Pinecone Truffles turned out. Leave a comment below and share your results, or ask any questions you may have. Happy truffle-making!
For more holiday truffles, handmade candies, and edible gifts, follow us on Pinterest and make your season sparkle.
Exciting Pinecone Truffles Recipe: Easy No-Bake Treat
Ingredients
Equipment
Method
- Preheat the oven to 350 degrees Fahrenheit. Evenly spread out the whole raw almonds on one lipped baking sheet, and the sliced raw almonds on another. Roast until very lightly deepened in color and fragrant, about 6-8 minutes for the sliced almonds and 10-12 minutes for the whole almonds.
- Grind the roasted WHOLE almonds in a blender or food processor until they reach a stage halfway between almond flour and almond butter. Set them aside.
- In the top of a double boiler, melt together the chocolate and cream until smooth, stirring constantly. Then remove from heat and stir in the ground roasted almond mixture, honey, vanilla, and salt until combined. Cover and place in the refrigerator for 90 minutes.
- Use a spoon to scoop out a roughly 2×1-inch cylinder of the truffle mixture. Form it into a egg shape that’s slightly skinner than an actual egg (aka the shape of a pinecone). Lightly roll it in the cocoa powder to make the exterior less sticky. Insert the roasted sliced almonds into the truffle at a low angle to mimic the scales of a pinecone. Repeat until you’ve used all the truffles + sliced almonds. Makes about a 18 pinecone truffles.