As a home baker, I’ve found that the simplest recipes often bring the most joy, and this memory is one of my favorites. I can vividly recall the scent of warm butter and sweet strawberries filling my kitchen, a smell that always promises a delightful treat.
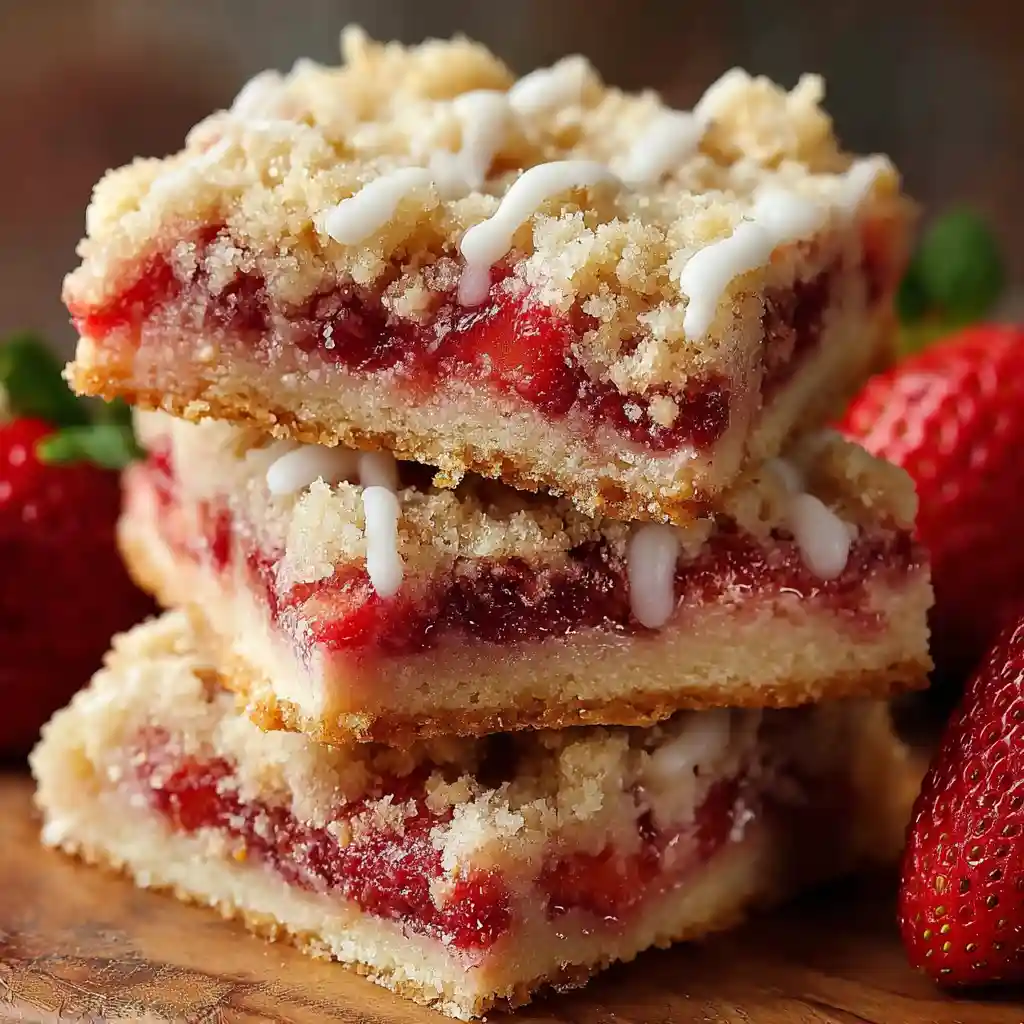
Today, I’m so excited to share with you my recipe for these irresistible Strawberry Shortcake Bars with a Buttery Crust. They capture all the beloved flavors of classic strawberry shortcake but in a wonderfully convenient bar form. You’ll be amazed at how easy they are to make, and they are truly perfect for any occasion, from a casual afternoon snack to a special dessert.
Table of Contents

Amazing Strawberry Shortcake Bars with Buttery Crust
Ingredients
Equipment
Method
- Preheat the oven to 350°F. Line an 8×8-inch square baking pan with parchment paper leaving a 2-inch overhang at each side.
- Make the crust and the crumb topping. Combine flour, both sugars and salt (if you’re using unsalted butter) in a medium bowl and mix to blend evenly so that there are no lumps of brown sugar. Add melted butter and vanilla to the dry ingredients and stir with a spoon until evenly combined, then toss with your fingertips to form large crumbs. Press about two-thirds of this mixture into the prepared pan in an even layer. Use floured hands so that it doesn’t stick and then smooth it over with an offset spatula. Bake the crust for 15-20 minutes until lightly golden then set aside to cool slightly.
- Make the strawberry filling. Combine chopped strawberries, sugar and flour in a medium bowl and toss to combine. Spoon it over the cooled crust in an even layer. Crumble the remaining crust mixture on top so it is evenly dispersed over the strawberries. You won’t cover the strawberries completely – you’ll still see them poking through. Bake for 30-35 minutes until the juices are bubbling and the shortbread crumb topping is golden. Set aside to cool completely in the pan.
- Make the glaze. Combine powdered sugar, cream and vanilla in a small bowl and whisk to combine. Drizzle it over the cooled bars, slice and serve!
Notes
Tried this recipe?
Let us know how it was!Why You’ll Adore These Strawberry Shortcake Bars with Buttery Crust
There are so many reasons why I think you’ll fall in love with these bars, but here are a few that truly make them stand out:
- An Unbelievably Buttery Shortbread Crust: This isn’t just any crust. My recipe uses a generous amount of butter, melted and combined with the flour and sugar, to create a tender, rich, and gloriously crumbly shortbread base that also doubles as the delicious topping. It’s the “secret weapon” that elevates these bars.
- Juicy, Perfectly Sweet Strawberry Filling: I love how the fresh strawberries become wonderfully tender and release their sweet juices as they bake, creating a vibrant burst of flavor in every bite. The touch of flour in the filling ensures it thickens beautifully without becoming watery.
- Effortless to Make, Utterly Irresistible: You don’t need to be a pastry chef to whip these up. The simple steps and readily available ingredients mean you can enjoy these delightful bars with minimal fuss. They are the definition of homemade goodness.
Ingredients You’ll Need for the Perfect Batch
Gathering your ingredients is the first exciting step towards baking success! Here’s everything you’ll need for these delightful bars:
For the Crust and Crumb Topping:
- 1 ¾ cups (250g) all-purpose flour
- ⅓ cup (65g) granulated sugar
- 3 tbsp (45g) packed light brown sugar
- ¾ cup (170g) salted butter, melted (or add a pinch of salt if using unsalted butter)
- 1 tsp (5ml) pure vanilla extract
For the Strawberry Filling:
- 3 cups (400g) chopped fresh strawberries
- 2 tbsp (25g) granulated sugar
- 1 tbsp (9g) all-purpose flour
For the Glaze:
- ½ cup (60g) powdered sugar
- 1 tbsp (15ml) light or heavy whipping cream
- ¼ tsp pure vanilla extract
Essential Equipment for Baking Success
Having the right tools makes any baking project so much smoother. For these Strawberry Shortcake Bars, I always reach for:
- An 8×8-inch square baking pan
- Parchment paper
- Medium mixing bowl
- Small mixing bowl
- Whisk
- Offset spatula or regular spatula
- Measuring cups and spoons
Unlocking the Secret to a Truly Buttery Crust
The magic of these bars lies in their incredibly buttery crust. Unlike a traditional pie crust that might be flaky or a cookie crust that’s crisp, this shortbread-style crust is designed to be tender, rich, and wonderfully crumbly, forming both the base and the delicious topping. The secret is in the ratio of butter to flour and how we combine them.
By using melted butter, we coat the flour particles, which inhibits gluten development, resulting in a tender texture rather than a tough one. This method also ensures that the butter is distributed evenly throughout the mixture, creating those delightful large crumbs when you toss it with your fingertips. This buttery shortbread base is sturdy enough to hold the juicy strawberry filling while also offering a melt-in-your-mouth quality that’s simply divine.
Strawberry Selection & Preparation: My Top Tips for Sweet Success
Choosing the best strawberries is key to making these bars burst with flavor. I always look for bright red, plump berries that have a sweet aroma. When you find them, give them a gentle wash under cool water and pat them dry carefully. Hull them by removing the green tops. For even baking and distribution, I like to chop the strawberries into bite-sized pieces, not too large and not too small.
To really amp up the strawberry flavor and ensure a luscious filling, I macerate them. This just means tossing the chopped strawberries with a little granulated sugar and the tablespoon of flour. The sugar draws out the natural juices from the berries, creating a lovely syrup, while the flour helps to thicken those juices slightly as it bakes, preventing a soggy bottom.
If you’re using frozen strawberries, make sure to thaw them completely and drain off as much excess liquid as possible before chopping and mixing them with the sugar and flour to avoid too much moisture in your filling.
How to Make Strawberry Shortcake Bars with Buttery Crust (Step-by-Step Instructions)
Let’s get baking! These steps are straightforward and will guide you to a perfect batch every time.
- Preheat the oven to 350°F. Line an 8×8-inch square baking pan with parchment paper leaving a 2-inch overhang at each side.
- Make the crust and the crumb topping. Combine flour, both sugars and salt (if you’re using unsalted butter) in a medium bowl and mix to blend evenly so that there are no lumps of brown sugar. Add melted butter and vanilla to the dry ingredients and stir with a spoon until evenly combined, then toss with your fingertips to form large crumbs. Press about two-thirds of this mixture into the prepared pan in an even layer. Use floured hands so that it doesn’t stick and then smooth it over with an offset spatula. Bake the crust for 15-20 minutes until lightly golden then set aside to cool slightly.
- Make the strawberry filling. Combine chopped strawberries, sugar and flour in a medium bowl and toss to combine. Spoon it over the cooled crust in an even layer. Crumble the remaining crust mixture on top so it is evenly dispersed over the strawberries. You won’t cover the strawberries completely – you’ll still see them poking through. Bake for 30-35 minutes until the juices are bubbling and the shortbread crumb topping is golden. Set aside to cool completely in the pan.
- Make the glaze. Combine powdered sugar, cream and vanilla in a small bowl and whisk to combine. Drizzle it over the cooled bars, slice and serve!
Expert Baking Tips & Troubleshooting for Your Best Bars Yet
To ensure your bars turn out absolutely perfect, here are a few extra tips and solutions for common baking puzzles:
- Pre-baking the Crust: I always pre-bake the crust for a bit before adding the filling. This step is crucial because it gives the crust a head start on baking, ensuring it becomes wonderfully golden and firm. This prevents that dreaded soggy bottom from the juicy strawberries.
- Cooling Steps are Key: Patience is a virtue in baking! It’s really important to let the bars cool completely in the pan before you attempt to glaze them or slice them. This allows the filling to set properly and makes cutting much cleaner. Rushing this step can lead to crumbly, messy bars.
- Pressing the Crust Evenly: When you’re pressing the crust mixture into the pan, try to get it as even as possible. I find using floured hands or even the bottom of a measuring cup helps create a uniform layer for the filling to sit on.
- Preventing Strawberries from Sinking: The tablespoon of flour in the strawberry filling isn’t just for thickening the juices; it also acts like a gentle net, helping to keep the strawberries from sinking all the way to the bottom of the crust.
- Achieving a Golden, Crispy Crumb Topping: For that perfect golden-brown crumb topping, watch for the edges of the bars to bubble and the crumb topping to turn a lovely golden hue. The 30-35 minute baking time is a good guideline, but ovens can vary!
- Common Troubleshooting:
- Bars are too soft: This usually means they need a little more baking time. Pop them back in the oven for another 5-10 minutes.
- Crust is too hard: This can happen if the crust mixture had too much flour or was overbaked initially. Be sure to measure your flour accurately and keep an eye on the initial bake time.
- Bars are difficult to cut: Ensure they are completely cool before slicing. A sharp knife, perhaps warmed slightly between cuts, can also help create clean edges.
- Ingredient Quality: For that truly exceptional “buttery crust” flavor, I always recommend using good quality salted butter. The fresh vanilla extract also makes a noticeable difference compared to imitation vanilla.
Choosing Your Topping: Beyond Basic Whipped Cream
While my recipe calls for a simple vanilla glaze, the beauty of these bars is their versatility. You can customize the creamy element to suit your mood!
| Topping Option | Description & Flavor Profile |
|---|---|
| Simple Vanilla Glaze | Our recipe uses this for a sweet, simple finish. It’s quick, easy, and adds a delicate sweetness that complements the strawberries and buttery crust beautifully. |
| Classic Whipped Cream | Light, airy, and wonderfully traditional. To make your own, whip 1 cup of heavy cream with 2 tablespoons of powdered sugar and ½ teaspoon of vanilla extract until soft peaks form. It’s a delightful contrast. |
| Cream Cheese Frosting | For something a little richer and tangier, try a simple cream cheese frosting. Beat 4 oz cream cheese with ¼ cup softened butter, 1 cup powdered sugar, and ½ tsp vanilla until smooth. It adds a lovely zing. |
| Lemon Glaze | For a bright, zesty twist, whisk together ½ cup powdered sugar with 1-2 tablespoons of lemon juice and a pinch of lemon zest until smooth. It offers a wonderfully refreshing contrast to the sweet berries. |
Make-Ahead Strategies for Effortless Baking
I love being able to get a head start on baking projects. Here’s how you can prepare components of these bars in advance:
- Crust/Crumble Mixture: You can combine the dry ingredients for the crust and crumble topping and store them in an airtight container at room temperature for up to 2 days. Add the melted butter and vanilla just before you’re ready to press it into the pan.
- Strawberry Filling: The strawberries can be chopped and combined with the sugar and flour up to 4 hours ahead of time. Store them covered in the refrigerator. This allows them to macerate and release their juices.
- Glaze: The simple vanilla glaze can be whisked together a few hours in advance and stored at room temperature, covered. You might need to give it a quick whisk again before drizzling if it thickens too much.
- Assembled Bars: I don’t recommend assembling the full bars and baking later, as the crust can become soggy. However, you could prepare the crust and bake it, then store it airtight at room temperature for up to 2 days. Add the strawberry filling and bake when ready.
Serving, Gifting, & Presentation Ideas
These bars are a treat on their own, but a little extra touch can make them even more special!
- Garnishing: A few fresh mint leaves, a couple of thinly sliced fresh strawberries placed strategically on top, a light dusting of powdered sugar, or a sprinkle of lemon zest can really elevate the presentation.
- Packaging for Gifting: For sharing, cut the cooled bars into neat squares. Wrap individual bars or small stacks in parchment paper and tie with kitchen twine, or place them in small decorative boxes or cellophane bags. They make for a lovely homemade gift!
- Serving Suggestions: These bars are wonderful served at room temperature. For an extra decadent treat, serve one alongside a scoop of good quality vanilla ice cream, or with a generous dollop of freshly whipped cream.
Strawberry Shortcake Bar Variations & Flavor Customizations
I love experimenting with flavors, and these bars are wonderfully adaptable. Here are a few ways to switch things up:
| Variation / Customization | Description |
|---|---|
| Mixed Berry Bliss | Substitute or combine strawberries with other berries like raspberries, blueberries, or blackberries. Adjust sugar slightly based on berry sweetness. |
| Citrus Zest Infusion | Add the zest of one lemon or orange to the crust mixture. It adds a beautiful brightness that pairs perfectly with the strawberries. |
| Almond Extract Boost | Swap out half of the vanilla extract for almond extract in the crust and/or glaze for a lovely nutty undertone. |
| Chocolate Swirl | Melt some white chocolate and drizzle it over the finished glaze for a sweet swirl, or stir white chocolate chips into the crust mixture. |
| Spice it Up | A small pinch of cardamom or cinnamon added to the crumble topping can bring a warm, cozy spice note to the bars. |
| Dairy-Free Option | Easily make these dairy-free by using a good quality plant-based butter alternative for the crust and plant-based cream for the glaze. |
Storing & Freezing Your Strawberry Shortcake Bars
Proper storage will keep your bars tasting their best.
- Storage at Room Temperature: Once completely cooled, you can store the bars at room temperature for up to 2 days. Keep them in an airtight container to prevent them from drying out or becoming stale.
- Refrigeration: For longer freshness, especially if you’ve used very ripe strawberries, refrigerating them is a good option. Store them in an airtight container for up to 4-5 days. To help prevent sogginess, I like to place a small piece of parchment paper between layers.
- Freezing Instructions: These bars freeze beautifully! Let them cool completely, then cut them into squares. Wrap each square tightly in plastic wrap, then in aluminum foil, or place them in a freezer-safe container or bag. They can be frozen for up to 3 months. To thaw, unwrap them and let them come to room temperature on a wire rack for a few hours.
Frequently Asked Questions (FAQ)
I get asked a lot of questions about baking, and here are some common ones for these bars:
Can I use frozen strawberries?
Yes, you can! Thaw them completely and drain off as much excess liquid as possible before chopping and mixing them with the sugar and flour for the filling. This helps prevent a watery result.
What kind of butter is best for the buttery crust?
I find that good quality salted butter yields the best flavor and texture for that signature buttery crust. If you prefer unsalted, just be sure to add a pinch of salt to the dry ingredients.
Can I make these bars gluten-free?
You can try substituting the all-purpose flour with a good quality gluten-free all-purpose flour blend that contains xanthan gum. Baking times might vary slightly.
How do I know when the bars are perfectly baked?
Look for the strawberry juices to be bubbling around the edges and the crumb topping to be golden brown. The center should look set, not liquidy.
Can I adjust the sweetness level?
You can slightly reduce the sugar in the filling if your strawberries are very sweet. For the glaze, add more powdered sugar for a sweeter glaze or a touch more cream for a thinner, less sweet one.
What if my bars are too crumbly/too hard?
Too crumbly can mean not enough moisture or butter, or perhaps over-baking. Too hard often means too much flour or over-baking. Precise measuring and watching the bake time are key!
What other pan sizes can I use, and how do I adjust?
You can use a 9×13-inch pan for thinner bars. You’ll need to roughly double the recipe and adjust the baking time, likely reducing it slightly since the bars will be thinner. For a square pan, an 8×8 is ideal for these quantities.
Other Delightful Berry & Bar Recipes You’ll Adore
If you loved making these Strawberry Shortcake Bars, I have a feeling you’ll enjoy these other recipes from Delish Script too!
- My Cozy Blueberry Crumble Bars are perfect for when blueberries are in season.
- For a touch of tartness, you’ll adore my Lemon Raspberry Bars.
- And if you’re looking for another simple berry treat, my Easy Berry Cobbler is always a winner.
Conclusion
There you have it – a recipe for Strawberry Shortcake Bars with a Buttery Crust that’s as delightful to make as it is to eat! I hope this recipe brings a little extra sweetness and joy into your kitchen. They’re proof that sometimes, the most wonderful treats are the ones made with simple ingredients and a lot of love.
I’d absolutely love to hear what you think of these bars! What’s your favorite topping or variation? Let me know in the comments below, and please feel free to ask any questions you might have. If you bake them, share a photo on social media and tag me using #DelishScriptShortcakeBars so I can see your delicious creations!