Table of Contents
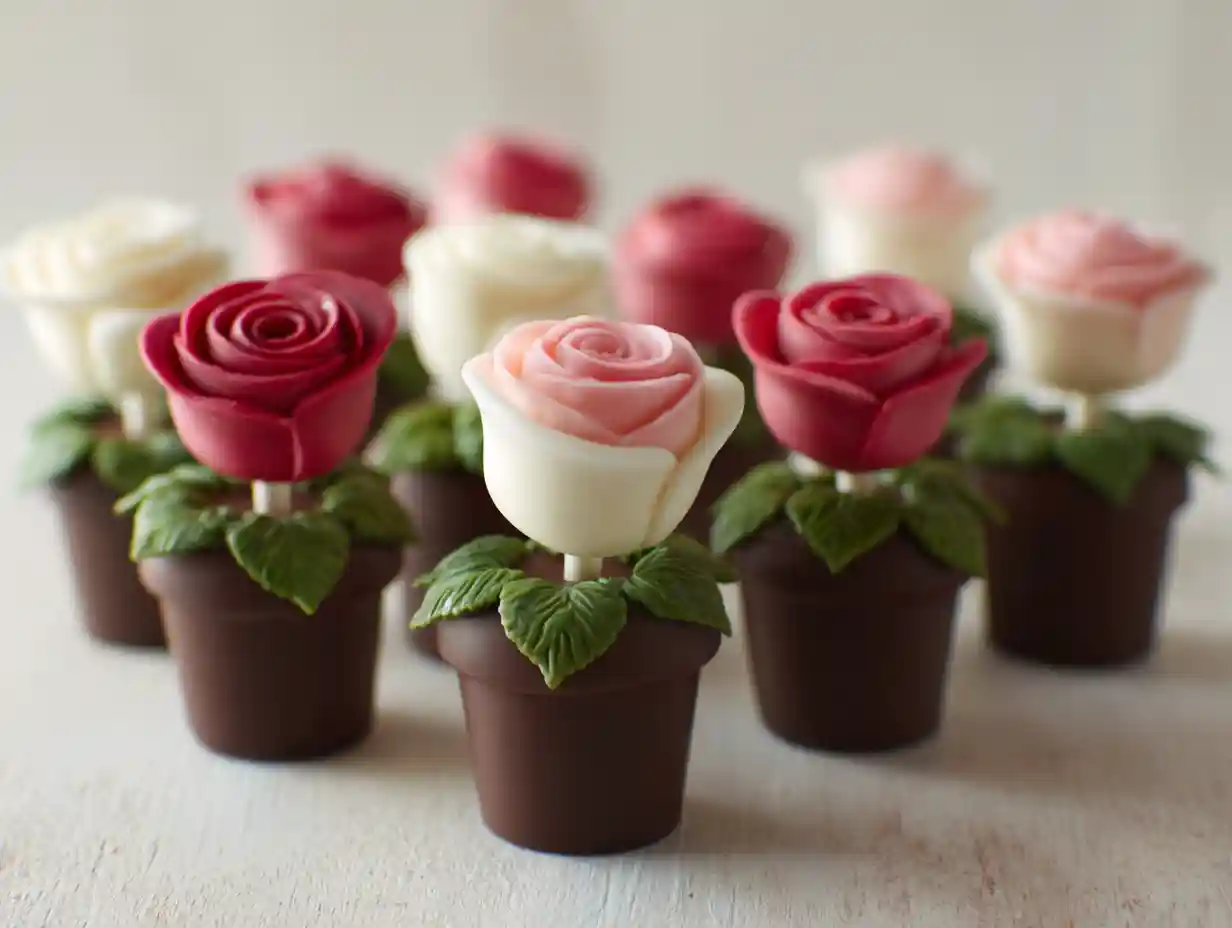
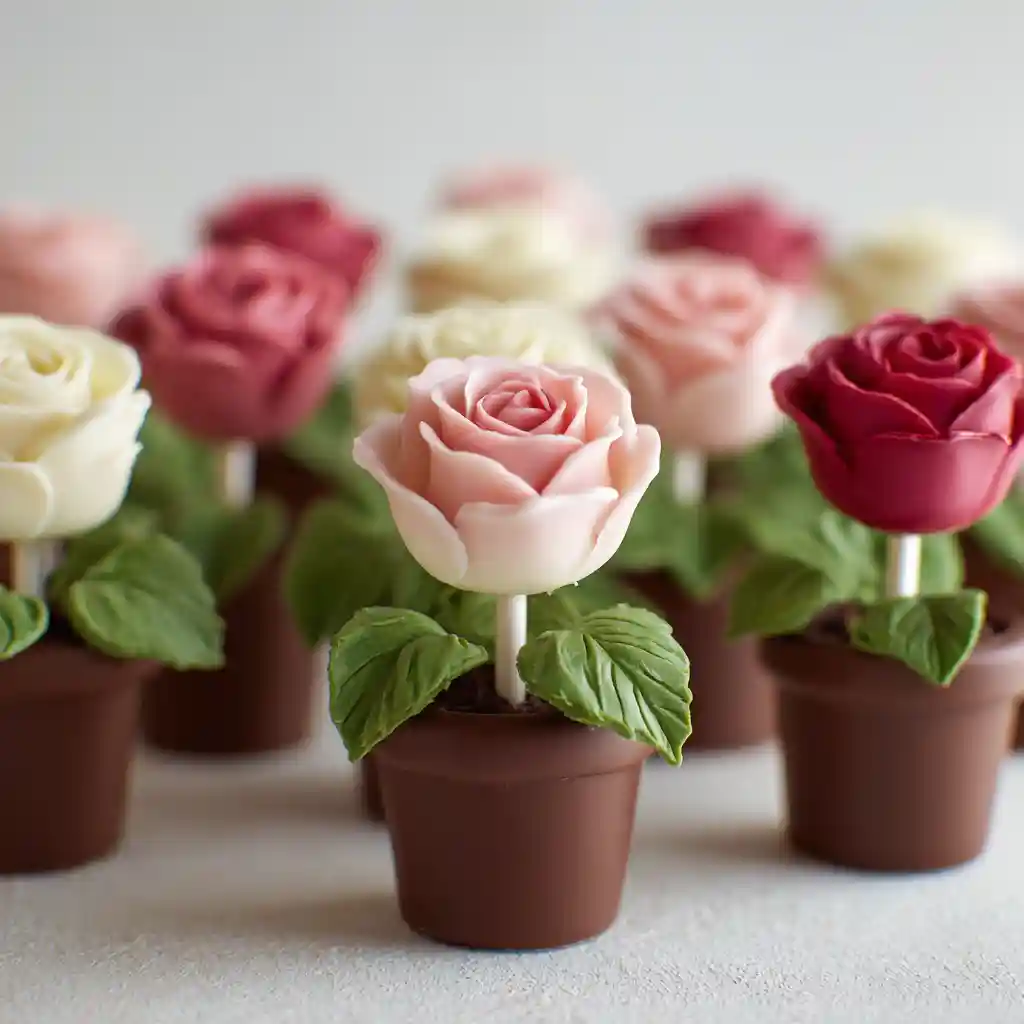
Unique Rose Cake Pops Recipe: A Delightful Treat
Ingredients
Equipment
Method
- To prepare the pots, start with the cupcake batter. In a bowl, add the softened butter in pieces and sugar. Also add the eggs, a pinch of salt, and beat the mixture with whisks to obtain a homogeneous cream.
- Then add the baking powder and the seeds from a vanilla pod.
- In a small separate bowl, sift the necessary amount of wheat starch, flour, and cocoa powder. Add them to the cream and mix thoroughly to incorporate. Then pour the mixture into a disposable piping bag.
- Take 8 round-bottom cones and fill them along the narrowest part with the mixture, so that once baked they reach the rim of the cone. Bake them in a preheated static oven at 350°F for about 20 minutes. Once baked, remove them from the oven and let them cool.
- To prepare the roses, start with the batter. In a bowl, beat the sugar and softened butter with electric whisks until creamy, then add the seeds from a vanilla pod and an egg. Beat the mixture.
- Then also add the sifted flour, wheat starch, and baking powder. Then mix everything with a hand whisk until smooth and homogeneous. Also add the zest of half a lemon. Pour the obtained batter into a disposable piping bag and pour it into the specific cakepop maker. You can cook the batter balls with the pre-set program (it will take about 3 minutes). Once cooked, remove them and let them cool completely on a rack, then stick the cake pops with plastic lollipop sticks.
- Meanwhile, melt the coarsely chopped white chocolate in a bain-marie, stirring with a spatula.
- Take the red liquid food coloring and add a few drops to the boiling fresh liquid cream. Stir until you achieve the desired color. You can add the colored cream to the now melted white chocolate and mix.
- Now that the melted chocolate is colored, you can dip the cake pops for a few moments, then place them on a base (such as polystyrene). Let them set in the freezer for at least 1 hour.
- Once they are well dried, you can decorate them with the colored chocolate left over, put in a disposable piping bag with a small hole at the tip. This way you can create concentric circles around the cake pops, getting smaller towards the top: they will simulate stylized rose petals.
- While these decorations also set, you can prepare the green leaves. Take the sugar paste and color it with a few drops of blue food coloring combined with yellow. Knead the sugar paste to mix the colors and achieve a bright green color.
- Roll out the sugar paste into a rectangle a few millimeters thick and cut out the leaves with a specific cutter or by cutting the shape with the tip of a knife. Take the pots, plant the roses, and add the green sugar paste leaves. Your rose cake pops are ready to be gifted and enjoyed!
Nutrition
Notes
Tried this recipe?
Let us know how it was!Why You’ll Love This Unique Rose Cake Pops Recipe
This isn’t just any cake pop recipe; it’s a charming creation that brings a smile to your face before you even take a bite. I love it because:
- It’s a Whimsical Duo: The combination of a mini cupcake “pot” base and a beautifully crafted cake pop “rose” is simply unique and utterly charming. It’s a delightful surprise for anyone receiving them.
- Visually Stunning: These aren’t just treats; they’re edible decorations! The delicate rose petals created with piped chocolate and the vibrant green sugar paste leaves make for a show-stopping dessert.
- A Joyful Project: While there are a few steps, each part is fun and rewarding. It’s a perfect recipe for a weekend project or a special occasion where you want to put in that extra bit of creative love.
Ingredients for Your Beautiful Rose Cake Pops
For the best results, I always try to use fresh, quality ingredients. It truly makes a difference in the final flavor and texture of any bake, and these special treats are no exception!
For the “Pots” (Cupcake Base)
- Butter at room temperature ½ cup
- Sugar 0.6 cup
- Type 00 flour ⅓ cup
- Wheat starch 1.4 oz
- Unsweetened cocoa powder 3 ½ tbsp
- Eggs medium 2
- Baking powder 1 tsp
- Fine salt to taste
- Waffles 8
For the “Roses” (Cake Pops) & Decoration
- White chocolate 9 oz
- Fresh liquid cream boiling ½ cup
- Sugar 0.375 cup
- Type 00 flour ½ cup
- Wheat starch 2 oz
- Butter 4.3 tbsp
- Lemon peel ½
- Eggs medium 1
- Baking powder ¾ tsp
- Vanilla bean ½
- Fine salt 1 pinch
- Food coloring red to taste
- Sugar paste 5.25 oz
- Food coloring yellow and blue to taste
Essential Equipment for Making Rose Cake Pops
Gathering all your tools before you start is a lifesaver! It makes the whole process flow so much smoother. You’ll need:
- Electric whisks or stand mixer
- Mixing bowls (various sizes)
- Sifter
- Disposable piping bags
- Round-bottom cones (for the pots)
- Static oven
- Cooling rack
- Cake pop maker
- Plastic lollipop sticks
- Bain-marie setup or microwave-safe bowl for melting chocolate
- Spatula
- Base for drying (like polystyrene)
- Small piping bag with a small tip (for decoration)
- Rolling pin (for sugar paste)
- Specific cake pop cutter or a sharp knife
- Small bowls for food coloring
Step-by-Step Instructions: Crafting Your Rose Cake Pops
Let’s get baking! This recipe is broken down into the components: the adorable pots and the stunning roses.
Preparing the Cupcake “Pots”
To prepare the pots, start with the cupcake batter. In a bowl, add the softened butter in pieces and sugar. Also add the eggs, a pinch of salt, and beat the mixture with whisks to obtain a homogeneous cream.
Then add the baking powder and the seeds from a vanilla pod.
In a small separate bowl, sift the necessary amount of wheat starch, flour, and cocoa powder. Add them to the cream and mix thoroughly to incorporate. Then pour the mixture into a disposable piping bag.
Take 8 round-bottom cones and fill them along the narrowest part with the mixture, so that once baked they reach the rim of the cone. Bake them in a preheated static oven at 350°F for about 20 minutes. Once baked, remove them from the oven and let them cool.
Making the “Roses” (Cake Pops) and Baking
To prepare the roses, start with the batter. In a bowl, beat the sugar and softened butter with electric whisks until creamy, then add the seeds from a vanilla pod and an egg. Beat the mixture.
Then also add the sifted flour, wheat starch, and baking powder. Then mix everything with a hand whisk until smooth and homogeneous. Also add the zest of half a lemon. Pour the obtained batter into a disposable piping bag and pour it into the specific cakepop maker. You can cook the batter balls with the pre-set program (it will take about 3 minutes). Once cooked, remove them and let them cool completely on a rack, then stick the cake pops with plastic lollipop sticks.
Dipping Your Rose Cake Pops
Meanwhile, melt the coarsely chopped white chocolate in a bain-marie, stirring with a spatula.
Take the red liquid food coloring and add a few drops to the boiling fresh liquid cream. Stir until you achieve the desired color. You can add the colored cream to the now melted white chocolate and mix. If the chocolate begins to seize, you can try thinning it with a small amount of vegetable shortening or coconut oil, as discussed in some expert tips for perfect rose cake pops.
Now that the melted chocolate is colored, you can dip the cake pops for a few moments, then place them on a base (such as polystyrene). Let them set in the freezer for at least 1 hour.
Decorating Your Rose Cake Pops
Once they are well dried, you can decorate them with the colored chocolate left over, put in a disposable piping bag with a small hole at the tip. This way you can create concentric circles around the cake pops, getting smaller towards the top: they will simulate stylized rose petals.
While these decorations also set, you can prepare the green leaves. Take the sugar paste and color it with a few drops of blue food coloring combined with yellow. Knead the sugar paste to mix the colors and achieve a bright green color.
Roll out the sugar paste into a rectangle a few millimeters thick and cut out the leaves with a specific cutter or by cutting the shape with the tip of a knife. Take the pots, plant the roses, and add the green sugar paste leaves. Your rose cake pops are ready to be gifted and enjoyed!
Expert Tips for Perfect Rose Cake Pops
Let’s talk about a few things that can help make your Rose Cake Pops turn out absolutely stunning.
- Candy Melt Mastery: If you’re using white chocolate and coloring it, you want it to be smooth and fluid. If it starts to thicken too much, a tiny touch of vegetable shortening or coconut oil can help thin it out beautifully. Just add a little at a time and stir until it’s the perfect dipping consistency.
- Achieving the Rose Shape: The key to those lovely petals is control. I find it helpful to let the dipped cake pop set a bit before starting the piped decorations. Start your concentric circles from the base of the dipped cake pop and spiral upwards, making each circle slightly smaller. Don’t worry if they aren’t perfect; nature isn’t perfect either, and a little variation adds to the charm!
- Piping Bag Prowess: When filling your piping bag for the decorative swirls, don’t overfill it. Roll the top down, and gently squeeze from the top down to control the flow of chocolate. Practice a few squiggles on parchment paper first to get a feel for the pressure needed.
Different Cake Flavor Ideas for Your Rose Cake Pops
While the recipe calls for a specific chocolate base for the pots, you can get creative with the cake pop part! Here are some ideas:
| Cake Flavor | Pairing Suggestion |
|---|---|
| Vanilla | White chocolate coating, sprinkles |
| Lemon | Lemon-infused white chocolate, yellow luster dust |
| Chocolate | Dark chocolate coating, cocoa powder dusting |
| Strawberry | Pink coating, freeze-dried strawberry powder |
Creative Decoration Options for Your Rose Cake Pops
Beyond the classic rose petal look, there are so many ways to make these treats sparkle!
| Decoration Type | Application Idea |
|---|---|
| Edible Glitter/Luster Dust | Apply with a soft brush for a shimmering finish. |
| Sprinkles/Nonpareils | Gently roll dipped cake pops or sprinkle on before setting. |
| Colored Sugar | Dip wet cake pops into colored sugar for texture. |
| Drizzle/Swirls | Use contrasting colored candy melts to drizzle patterns. |
| Fondant Accents | Cut out tiny shapes (leaves, hearts) from fondant. |
| Edible Flowers | Attach small, food-safe pressed edible flowers. |
Troubleshooting Common Cake Pop Problems
Even the most experienced bakers run into a few hiccups now and then. Here’s how to tackle common cake pop issues:
| Problem | Possible Cause | Solution |
|---|---|---|
| Cake pops falling off stick | Cake too moist, stick not secured, chocolate too thick | Ensure cake is well-chilled; dip stick in chocolate before inserting; thin chocolate. |
| Cracking/Uneven Coating | Temperature difference, chocolate too hot/thick | Ensure cake pops are very cold; let chocolate cool slightly; thin chocolate. |
| Lumpy Chocolate Coating | Overheating, moisture | Melt chocolate slowly in a double boiler; ensure no water gets in. |
| Cake pops too soft/crumbly | Too much binder (frosting/cream) or not enough | Adjust binder, ensure proper chilling time. |
Make-Ahead and Storage Tips for Rose Cake Pops
Planning is key for projects like this!
- Make Ahead: You can bake the cupcake “pots” a day in advance and store them in an airtight container at room temperature. The cake pop balls can also be baked and cooled completely, then stored in an airtight container for up to two days at room temperature before dipping.
- Storage: Once decorated, I recommend storing the finished Rose Cake Pops in an airtight container in a cool, dry place. Avoid direct sunlight or heat, which can melt the chocolate. They should stay fresh for about 3-4 days.
- Freezing: While not ideal, you can freeze the undecorated cake pop balls. Wrap them well in plastic wrap and then place them in an airtight container or freezer bag. Thaw them at room temperature before dipping. For finished cake pops, freezing can sometimes affect the chocolate’s appearance due to condensation, so it’s best to consume them fresh.
Vegan and Gluten-Free Adaptations for Rose Cake Pops
Making treats accessible for everyone is a joy! For vegan versions, you can swap the butter for a good quality vegan butter, use a flax egg or commercial egg replacer, and opt for vegan white chocolate. For gluten-free, a good all-purpose gluten-free flour blend should work well for both the pots and the cake pops. Always double-check your ingredient labels to ensure they are certified vegan or gluten-free for safety.
Serving and Gifting Your Beautiful Rose Cake Pops
These Rose Cake Pops are showstoppers on their own! For parties, arrange them on a tiered dessert stand or a decorative platter. For individual gifts, place each one in a clear cellophane bag tied with a pretty ribbon. They also make a wonderful surprise for a teacher, a friend, or as a charming addition to a brunch spread.
FAQs about Rose Cake Pops Recipe
Can I use a box cake mix for the cake pop batter?
Yes, you can! A standard box cake mix, prepared according to package directions with the binder usually suggested (like eggs and oil, or sometimes water), can be used as a base for cake pops. Ensure it’s baked and cooled thoroughly before proceeding.
How long do rose cake pops last?
Stored properly in an airtight container at room temperature, they are best enjoyed within 3-4 days.
What’s the best way to color white chocolate?
For vibrant colors without affecting the texture, it’s best to use oil-based candy colors or gel food coloring specifically designed for chocolate. Water-based colors can cause chocolate to seize.
Can I make these without a cakepop maker?
Absolutely! You can bake the cake pop batter in mini muffin tins or even as a sheet cake, then crumble it and mix with frosting to form balls, which you then chill and proceed with dipping. It will take a bit more time but is definitely achievable.
Conclusion
And there you have it – a delightful journey into creating these stunning Rose Cake Pops in their cute little pots! I truly hope you have as much fun making them as I do. They’re a testament to how a little creativity can transform simple ingredients into something truly special.
Now, I’d love to hear from you! Did you try this recipe? What colors did you choose for your roses and leaves? Share your thoughts, twists, or any questions you might have in the comments below. Happy baking!